adsense analytic

Tuesday, March 31, 2020

Different types of BBS shape codes for steel

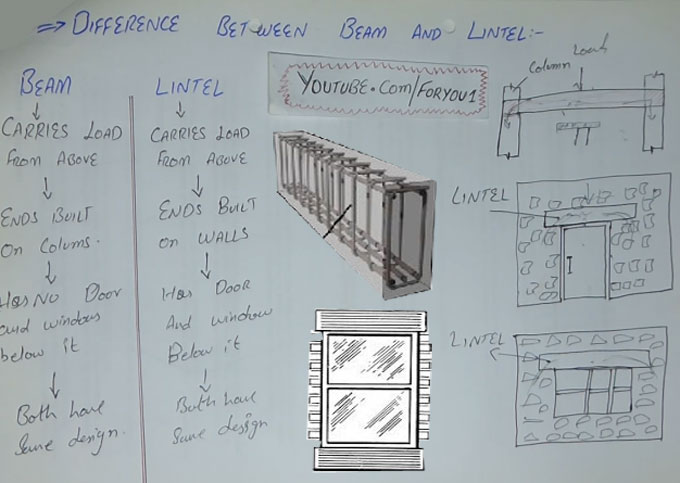
Sami Ullah, the renowned civil engineer, presents this useful video tutorial in civil engineering youtube channel. In this video, the detail process is given for finding out the quantity of steel as well as shape codes for the steel bars.

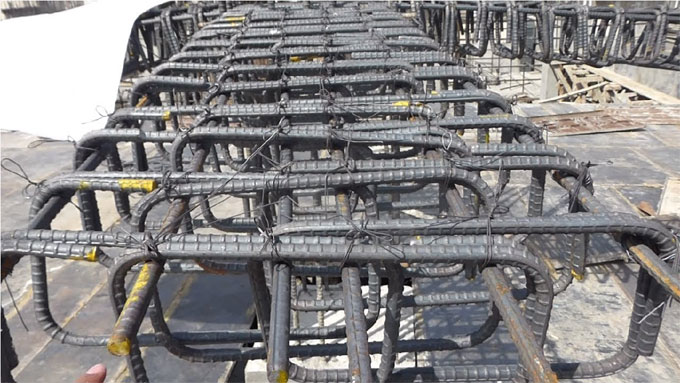
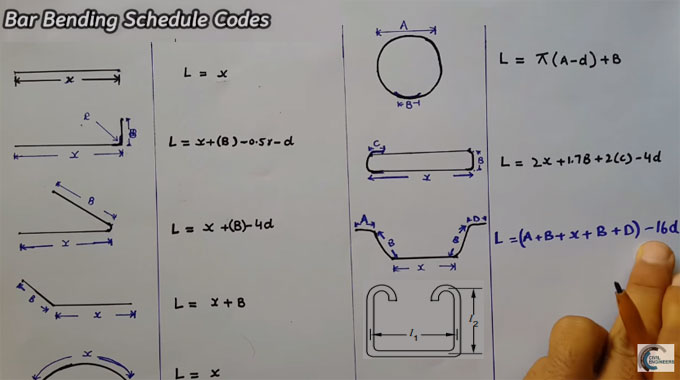
Shape codes are considered as the basis of a proper bar bending schedule.

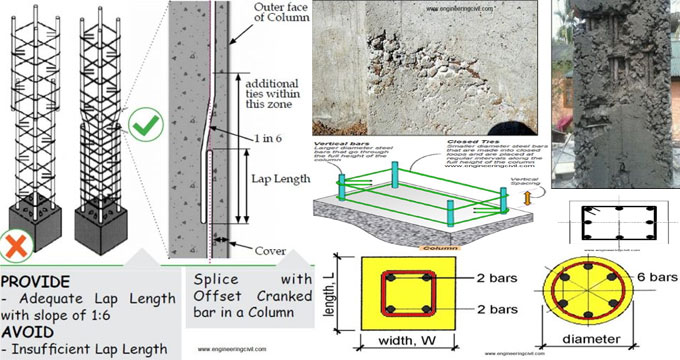
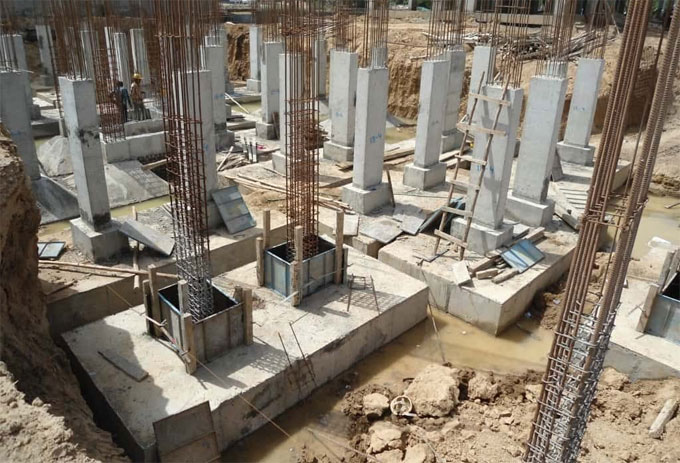
While going to estimate the reinforcement detailing for various members concerning a building, small bent ups and other angle detailing should be considered in the calculation to produce valid and cost-effective bar bending schedule.

It will significantly reduce the cost and wastage of reinforcement.

In beams & slabs there exist various bent ups, cuttings, and development lengths. Each and every bend and angle presented in the member is the outcome of design calculation. Therefore, these should be carefully enforced in practice.

For small projects, it is unnecessary to compute these details, just include a few more inches and work out the Bar Bending Schedule.

Different types of BBS shape codes for steel

~~~~~~~~~~~~~~~~~~~~~~~~~~
Published By
Rajib Dey
www.constructioncost.co
~~~~~~~~~~~~~~~~~~~~~~~~~~

Monday, March 30, 2020

How beam and lintel differs as per structural behavior & load carrying system

This construction video tutorial briefly explains the variations among beam and lintel.
Both the beam and lintel are flexural as well as horizontal members and considered as the vital parts of structural system. But these differ according to their structural behavior and load carrying system.
Given below the points of differentiation:-
How beam and lintel differs as per structural behavior & load carrying system
~~~~~~~~~~~~~~~~~~~~~~~~~~
Published By
Rajib Dey
www.constructioncost.co
~~~~~~~~~~~~~~~~~~~~~~~~~~

Friday, March 27, 2020

Methods of Repairing Cracks in Concrete

It is generally determined that concrete structures face cracking hassle in the course of its lifestyles. This crack ought to be given extreme and careful attention and repair on proper time. Repairing cracked concrete involves quite a few time and value constraints.
There are several techniques of concrete crack restore. Choosing the ideal technique of concrete crack repair will let you save a whole lot of time, cash and power and might deliver long-lasting results. It is vital to understand the kind and nature of cracks that have appeared inside the construction to have the ability to pick out the most suitable and price-effective technique of restore. It is also vital to recognize the cause of cracks so that it is able to be corrected to preserve the cracks from recurring.
The following are the methods of repairing cracks in concrete:
Epoxy Injections: Epoxy injection technique of concrete crack repair can be used to bond the cracks having greater than or same to 0.05mm opening. This technique is not appropriate for crack is energetic and if the cracks are large in number, or whilst the water leakage can't be controlled.
In this approach, the cracks on uncovered concrete surfaces are sealed through injecting epoxy under the concrete crack. But, it's essential to find and connect the major motive of cracks before injecting the epoxy into the cracks otherwise the cracks will keep on emerging once more and again.
Problems which include leakages and silt contamination harm the efficiency of epoxy, therefore it is recommended to fix these problems earlier than injecting the epoxy to make it remaining longer. The Epoxy injection approach of crack repair requires quite a few discipline and skillful execution so that you need to make sure that the person executing the repairs knows his work.
~~~~~~~~~~~~~~~~~~~~~~~~~~
Published By
Rajib Dey
www.constructioncost.co
~~~~~~~~~~~~~~~~~~~~~~~~~~

Thursday, March 26, 2020

How to resolve incorrect myth about column construction

The super structure can be developed in different methods. The walls of houses for two to three storied structures can be constructed with bricks containing the slabs, lintels, chajja etc. in reinforced concrete in the regions where superior quality bricks are obtainable.
Such construction is known as load bearing construction due to the whole load generating from the slabs, beams, walls etc is delivered to the foundation via the brick walls.
In the regions where natural disasters like earthquake or high speed storms occur frequently, such load bearing wall construction is unsafe for resisting horizontal drifts if not retrofitted. This type of construction is appropriate upto G+2 storied building on the whole.
The demand for RCC (Reinforced Cement Concrete) framed construction will be increased to cope up with the requirement of developing high storied building with natural hazards.
Generally, RCC framed construction comprises of a series of columns which are arranged properly in the house and interconnected with beams to build a frame. These columns deliver the building load to soil located below via RCC footings.
The frame, starting from the foundation, has to be designed by A structural engineer will design the frame that start from the foundation as well as settle on the mix of concrete to be applied, the sizes of columns and beams, the reinforcement to be arranged therein, on the basis of the loads to be retained by the structure.
Definition of Column: Column stands for a vertical compression member that transfers the load of the structure to foundations. They are reinforced with the use of main longitudinal (vertical) bars to withstand compression and/or bending; and transverse steel (closed ties) to withstand shearing force.
How to resolve incorrect myth about column construction
~~~~~~~~~~~~~~~~~~~~~~~~~~
Published By
Rajib Dey
www.constructioncost.co
~~~~~~~~~~~~~~~~~~~~~~~~~~

Tuesday, March 24, 2020

Staircase Dimensions - How to Calculate Properly

Staircase measurements are a significant piece of staircase security. This page covers the entirety of the significant staircase estimations and a slip-up to keep an eye out for! Staircase dimensions are an important part of staircase safety. Here isn this article we cover all of the important staircase measurements and mistakes not to ignore.
Treads and Risers: The tread size (min 10ins/25.4cm) is directed by the normal grown-up foot size, despite the fact that it isn't important to have the option to accommodate your whole foot on a tread all together for strolling up the stairs to be both agreeable and safe.
The riser height (max 7¾ins/19.7cm) is constrained by the manner by which we descend the stairs. Things being what they are, you could move up definitely more than 7¾ inches effectively and you could descend unquestionably more than 7¾ inches effectively on the off chance that you are confronting in reverse. The rungs of a stepping stool are set at progressively like 12ins/30cm separated. However, we go down the stairs confronting advances, and it's this that restrains the riser size to being a lot smaller.
The most extreme measurement between balusters is 6ins/15.2cm. I don't know for certain what this depends on, however I'm thinking the thought is that it shouldn't be anything but difficult to get a foot or arm caught in the middle of a baluster. Having said that there are a lot of staircase plans where the external handrail has greater holes or is missing through and through.
Staircase estimations: To compute the run of the stairs, just duplicate the tread measurement (guarantee this does exclude the nose - see underneath) by the quantity of steps.
To figure the rise of the stairs, increase the rise measurement by the quantity of steps.
Or on the other hand, to turn out what number of steps you need, take your ceiling height and separation by suppose 16 to begin with. On the off chance that you think of a riser that is a sensible size and not exactly the greatest measurement shown above you need 16 stages. Have a go at partitioning your ceiling height by different numbers until you concoct a riser measurement that works.
Staircase Dimensions - How to Calculate Properly
~~~~~~~~~~~~~~~~~~~~~~~~~~
Published By
Rajib Dey
www.constructioncost.co
~~~~~~~~~~~~~~~~~~~~~~~~~~

Structural Load Analysis of a Construction

Structural analysis is a significant piece of a design of structures and other constructed resources, for example, scaffolds and passages, as structural loads can cause pressure, twisting and uprooting that may bring about structural issues or even disappointment.

The structure guidelines necessitate that structures must be designed and worked to have the option to withstand all load types that they are probably going to look at during their lifecycle.

There are various sorts of load that can follow up on a structure, the nature of which will change as indicated by the design, use, area and materials being utilized. Design necessities are commonly indicated as far as the greatest loads that a structure must have the option to withstand.

Loads are commonly named either dead loads (DL) or live loads (LL). Dead loads allude to the structure's self weight and for the most part stay consistent during the structure's life. Live loads, for example, traffic loads may fluctuate.

Loads may likewise be classified as:

Concentrated loads (or point loads): Single loads that demonstration over a generally little zone, for example, column loads.

Line loads: Loads apply a load along a line, for example, a parcel's weight on the floor.

Distributed (or surface) loads: These apply a load over a surface zone, for example, the heaviness of floors and roofing materials.

Dead loads (DL): Dead loads, otherwise called perpetual or static loads, are those overwhelmingly connected with the heaviness of the structure itself, and thus stay stationary and moderately consistent after some time. Dead loads may incorporate the heaviness of any structural components, lasting non-structural segments, relentless installations, for example, plasterboard, worked in cabinets, etc.

Structural Load Analysis of a Construction

~~~~~~~~~~~~~~~~~~~~~~~~~~
Published By
Rajib Dey
www.constructioncost.co
~~~~~~~~~~~~~~~~~~~~~~~~~~

Saturday, March 21, 2020

Methods of Repairing Cracks in Concrete

It is generally determined that concrete structures face cracking hassle in the course of its lifestyles. This crack ought to be given extreme and careful attention and repair on proper time. Repairing cracked concrete involves quite a few time and value constraints.

There are several techniques of concrete crack restore. Choosing the ideal technique of concrete crack repair will let you save a whole lot of time, cash and power and might deliver long-lasting results. It is vital to understand the kind and nature of cracks that have appeared inside the construction to have the ability to pick out the most suitable and price-effective technique of restore. It is also vital to recognize the cause of cracks so that it is able to be corrected to preserve the cracks from recurring.

The following are the methods of repairing cracks in concrete:

Epoxy Injections: Epoxy injection technique of concrete crack repair can be used to bond the cracks having greater than or same to 0.05mm opening. This technique is not appropriate for crack is energetic and if the cracks are large in number, or whilst the water leakage can't be controlled.

In this approach, the cracks on uncovered concrete surfaces are sealed through injecting epoxy under the concrete crack. But, it's essential to find and connect the major motive of cracks before injecting the epoxy into the cracks otherwise the cracks will keep on emerging once more and again.

Problems which include leakages and silt contamination harm the efficiency of epoxy, therefore it is recommended to fix these problems earlier than injecting the epoxy to make it remaining longer. The Epoxy injection approach of crack repair requires quite a few discipline and skillful execution so that you need to make sure that the person executing the repairs knows his work.

Epoxy resin loses power while exposed to fireplace or sustained elevated temperatures and fireproofing safety is required for such structural maintenance.

Methods of Repairing Cracks in Concrete
~~~~~~~~~~~~~~~~~~~~~~~~~~
Published By
Rajib Dey
www.constructioncost.co
~~~~~~~~~~~~~~~~~~~~~~~~~~

Thursday, March 19, 2020

The Goa-Karnataka Highway Project to Start Soon

The IRB Infrastructure Developers Ltd. have announced the commissioning of the Goa-Karnataka Border Highway to Kundapur on Wednesday. The highway is to have four lanes and have a concession life of 28 years. The projected cost of the construction is Rs. 3447 crore.

One of the biggest private companies in India to build road infrastructure, the IRB has constructed over 12600 kilometers of lanes already. With impeccable reputation, they seem to be well-suited to handle this project. With this project commissioned, all the 12 projects under the company’s wing presently ongoing are going to be revenue generating.

The actual commissioning is done by the IRB Westcoast Tollway, a subsidiary of IRB Infrastructure. They have commissioned the Goa-Karnataka Border to Kundapur 4-lane highway project. Thus it will be open for vehicular traffic.

Features of the project:

Total length of serviceable road: 61.26 km
Pedestrian underpasses: 9
Vehicular underpasses: 3
Flyovers: 4
Minor bridges: 39
Major bridges: 14
Intersections with other roads: 23
Culverts and similar passes: 573
line over bridges: 3
Toll fee collection plazas: 3
Concessional life: 28 years
Estimated total cost of construction: Rs. 3,447 crore


The company chairman and managing director Virendra D Mahaiskar said, “We are happy to commission the important coast highway infrastructure link between West and South India. We believe that the project would bring the world class and safe commuting experience of the highway infrastructure in India.”

The Goa-Karnataka Highway Project to Start Soon

~~~~~~~~~~~~~~~~~~~~~~~~~~
Published By
Rajib Dey
www.constructioncost.co
~~~~~~~~~~~~~~~~~~~~~~~~~~

Wednesday, March 18, 2020

How to Calculate the Safe Bearing Capacity of Soil

It is extremely important to figure out the safe bearing capacity of the soil at the construction site. If this is not done properly, the structure may settle, and the building may get damaged, or even collapse. For this reason, we perform various tests to find out the safe bearing capacity of the soil. Today, let us see how we can do this.

The safe bearing capacity of soil is defined as the maximum load per unit area that the soil can bear without any displacement or settlement. This is measured in terms of kilograms per square centimeter. If the load exceeds this mark, the soil will start to displace or break. This will lead to structure settlement, which can end up in destructive results.

Formula:
Safe bearing capacity of soil = (ultimate bearing capacity)/(Cross-section area x Factor of safety)


Explanation: The ultimate bearing capacity of the soil is the point at which the soil starts to displace under load.

Any soil can take up to a certain amount of load only, after which it starts to settle or displace.

The cross-section area is the area of soil on site on which the tests are being performed. It can be a square meter in general practice.

The factor of safety indicates how safe the soil capacity results must be before considering a certain type of construction. Naturally, it depends upon the type of building being constructed. It is kept at 2 for general civil constructions and 3 for high-rise or heavy constructions.

How to Calculate the Safe Bearing Capacity of Soil
~~~~~~~~~~~~~~~~~~~~~~~~~~
Published By
Rajib Dey
www.constructioncost.co
~~~~~~~~~~~~~~~~~~~~~~~~~~

Monday, March 16, 2020

Contemporary 3BHK Duplex House Design

Today we will review the design of Arabella, a contemporary 3BHK duplex. It is a rather small house with a space-saving design, which puts the living area in the ground floor and the sleeping area on the first floor. The total livable area in this house is 232 square meters. On top of that, you have a roof deck.

The Arabella design is suitable to build in any plot with 176 square meters of area. The Building is attached with a one-side firewall. The front of the plot must have at least 11.5 meters of clearing.

1. Advantages of of the design
2. Modern looks
3. Suitable for urban areas
4. Suitable for seasides and mountainsides
5. Roof deck offers panoramic view of surroundings and sky


Color scheme suitable for this design: The walls should be painted a stark or mellow white, including the main wall. Accents should be painted a dark color contrasting with the walls, but not clashing contrast.

Other areas like roof bars and doors should have light earth colors like wood finish. Large aluminum framed windows should have dark gray frames and dark glasses in order to imbue more depth of field to the white walls.

Ground Floor Plan: Ground floor plan of the Arabella design consists of the living and utility area. It has: living room, dining, kitchen, common toilet and bath. Outdoors building will consist of the garage, lanai, porch, service/laundry area.

Contemporary 3BHK Duplex House Design
~~~~~~~~~~~~~~~~~~~~~~~~~~
Published By
Rajib Dey
www.constructioncost.co
~~~~~~~~~~~~~~~~~~~~~~~~~~

Saturday, March 14, 2020

Advantages and Disadvantages of On-site and Off-site Construction

The needs and restrictions at your construction project may make you choose between one of the two main methods of construction: on-site and off-site. Both are widely used in today’s construction industry, depending upon the requirements at the site and according to design.

What is On-Site Construction?
On-site construction is the more traditional method. Here, structures are assembled from raw materials at the site itself, hence the name. The method has to be carried out sequentially and materials needs to be stored and used at the site.


What is Off-Site Construction?
With modern technologies, off-site method of construction has become possible. In this, parts or blocks of the structure are constructed in a designated factory or yard in standardized process. Then, these pre-built blocks are carried to the project site where they are assembled together to form the structure.


Both of the above methods have their own advantages and disadvantages, which make them suitable to different scenarios. Let’s discuss them below.

On-Site Construction

Advantages:

1. Customized Design: Since there is no restriction on what shape of objects are available of construction, there are limitless customization options in this manner. In fact most non-standard designs have to rely upon the on-site method just for this.
2. Alteration: After the construction you can easily modify the structure with this method. It doesn’t require you to depend upon third-party construction factories to add or change a room in your house that has been constructed in the traditional method.
3. Space-friendly: Transporting precast blocks in tight urban areas can get simply impossible. More often, it’s prohibitively expensive. In these scenarios you have no choice but to construct everything on-site.
Advantages and Disadvantages of On-site and Off-site Construction

~~~~~~~~~~~~~~~~~~~~~~~~~~
Published By
Rajib Dey
www.constructioncost.co

~~~~~~~~~~~~~~~~~~~~~~~~~~

Friday, March 13, 2020

Minimum Foundation Depth for Houses

The foundation of a house is what holds the structure up, carries its entire weight. When you try to design a new building, you must consider how deep the foundation should be in order to properly support the building. This is called the foundation depth. It is measured by the vertical distance between the footing and the natural ground surface.
Expansive Soil: One thing to be kept in mind here that light soil has expansive properties. Due to wet and dry weathers, the soil can inflate and condense accordingly. This changes the effective natural ground surface level.
As a rule of thumb, foundations are placed under this level of soil, where such changes do not occur. That is about a meter in depth, in most cases.
However, this can be significantly higher if you have expansive soil or black cotton soil on site. This type of soil can take a load of 200-300 kpa only. Any more and the building will settle.
Groundwater Under Soil: Also, another thing to be kept in mind when deciding the minimum foundation depth is the presence of water under the ground. If the groundwater table is close to the foundation, then the soil under the foundation can flow around.
Water seeps up into the soil and makes it weak. To resist this, the bottom of the footing should be placed at a deep enough place where groundwater does not seep into the soil any more.
Cold Regions: Frost changes the nature of soil. It heaves the soil upward and that may create cavities underground. For this reason, in cold regions where snowing and/or ground frosts are normal, the foundations for outside columns or walls should be placed below the level down to which frost can affect the soil.
In the northern US, this can be as deep as 1.5 meters. Further, if the internal walls are heated, then the outer walls would require a deeper foundation so that the heat does not alter the soil properties.
Minimum Foundation Depth for Houses
~~~~~~~~~~~~~~~~~~~~~~~~~~
Published By
Rajib Dey
www.constructioncost.co
~~~~~~~~~~~~~~~~~~~~~~~~~~

Thursday, March 12, 2020

The four types of Shallow Foundation

Shallow foundation is applied in cases where we can find good load-bearing soil at a rather low depth. The foundation depth must meet the safety requirements of the breakdown. That is, after the application of load, the complete structure settlement will be within acceptable limits.
We can use the following four types of shallow foundations: Spread Footing, Combined Footing, Raft Foundation and Ring Foundation.
1. Spread Foundation: You need to spread the load from the column or wall to a larger area, you should use Spread Foundation. The width of the footing area is much wider than the wall or column.
The spread footing that is used to support a wall is called a wall footing or continuous footing. The top of the footing may be stepped or tapered, increasing the width gradually from wall or column to the base. They are of the following types:
a) Strip Footing: This primitive type of footing has been conventionally used in most constructions historically, before more modern inventions. They are mostly made of stones, masonry or concrete. The strip footing that is constructed of stone blocks generally has a stepped top. In modern days, however, the use of strip footing has become next to obsolete. Only in some light loading residential construction is strip footing still used.
b) Isolated Footing: When you provide footings under columns separately in a framed structure, it is called Isolated footing, pad footing or column footing.
In most cases, square footings are used under columns. However, space restrictions may force you to use rectangular footings. In case of circular columns, circular footings may be used, though it is not common. It may be used in special circumstances where construction work is difficult, or the load has to be dispersed very equally.
2. Combined Footing: When two columns are too close to make separate footings for each, then their footings are combined. These may be of the following three types:
a) Rectangular footing: These are the most common types of combined footing. It’s basically two square footings constructed together. This is used when each column is bearing the same load and of the same size.
The four types of Shallow Foundation
~~~~~~~~~~~~~~~~~~~~~~~~~~
Published By
Rajib Dey
www.constructioncost.co
~~~~~~~~~~~~~~~~~~~~~~~~~~

Friday, March 6, 2020

Construct Earthquake Resistant Buildings by Simple Means

The engineering science is continuing to advance in response to seismic threats. There have been significant breakthroughs in the field. However, most of them are very complex and require exceptional machinery. Not to mention, expensive as well. However, there are some simple ways to build a structure that will be resistant to earthquake damages up to a certain level.
In areas where seismic activity is not too harsh, we can utilize these techniques to same money and complexity but make the building resistant to seismic activities.
Structure Stiffness: The most traditional way to fight quakes is to use stronger materials to construct the building. Stiffer or heavier members can be used to fight the lateral forces generated during seismic activities. For special quake-proof structures, ACI codes prescribe at least 10” thick members.
Geometrical Absorption: The building can be planned in such a regular and special geometrical shape that it disperses the seismic forces evenly so that no particular member experiences excessive force. This naturally fares much better than a poorly-planned unsymmetrical building.
For existing buildings that are structurally asymmetrical, you can use seismic joints and expansion points in places where the forces are dispersed unevenly. Providing extra columns, shear walls, and framing can make the weaker section withstand the extra forces to a good level. Parking levels should have extra reinforced columns in order to negate the soft story effect.
Lateral Force Resistance: Using three types of lateral force resisting systems, we can try to negate much of the seismic forces. These are:
1. Moment Resisting Frame System: it is designed to resist all types of earthquake generated forces acting on the structure. They can be customized to fit the seismic activity scale of the region.
2. Building Frame System: these are designed to resist gravitational loads only, but they function excellently in that. A shear wall is added to resist the lateral forces acting on structure.
3. Dual Frame System: this is a combination of the above two systems. Shear walls along with moment resisting frames work excellently to fight off the vibrations and displacements from an earthquake. But, of course, they are more complex and costlier to build.
Construct Earthquake Resistant Buildings by Simple Means
~~~~~~~~~~~~~~~~~~~~~~~~~~
Published By
Rajib Dey
www.constructioncost.co
~~~~~~~~~~~~~~~~~~~~~~~~~~

Thursday, March 5, 2020

How to Control Reinforcement Activities On-site

It is imperative to control reinforcement activities in a building construction site. Otherwise the building may get damaged due to any shift in loads, or may simply break down at the slightest seismic activity.
First of all, you need to hire one or more qualified engineers to oversee different parts of the construction process. Aslo, you need to assign as many assistants as necessary to them.
A. Planning Phase: You need to study the documents concerning the project carefully as to divine the exact requirements. You also have to make sure the planning goes according to technical specifications. Then locate the provisions regarding mode of measurement in item fee agreement.
Check the objects payable which includes reinforcement, and whether or not laps, spacers and chairs are payable or inclusive. Arrange the required applicable codes,requirements and different related documents at the website for reference and study.
Study the tender drawings without fail. Calculate quantity as in keeping with the preliminary drawings, Dia clever and grade sensible. Mastermind the necessary pertinent codes, standards and other related archives at site for reference and study.
Study the delicate drawings without fail.Calculate amount according to the starter drawings, Dia savvy and grade insightful. Set up the monthly shrewd obtainment plan according to the development plan. Get ready to obtain a calendar of authoritative alongside support plan.
Plan for spread squares and joins (whenever required) ahead of time to get the required quality of spread squares thrown at site. Get Dia shrewd and grade savvy amounts from creator for singular amount contract if drawings were not accessible at starting phases of undertaking for arranging acquisition.
Permit a stock of 45 days while arranging obtainment or relying on the accessibility. Indent just 90% of amounts of absolute necessity till you have every endorsed attracting to keep away from varieties because of configuration/drawing corrections.
How to Control Reinforcement Activities On-site
~~~~~~~~~~~~~~~~~~~~~~~~~~
Published By
Rajib Dey
www.constructioncost.co
~~~~~~~~~~~~~~~~~~~~~~~~~~

Wednesday, March 4, 2020

Safety Plan for Concrete Formwork

Safety first! The age-old construction motto has never wavered even in modern days. Accordingly, it is in effect also when planning for formwork systems. A proper plan that observes safety protocols strictly will let you avoid undesirable circumstances arising in work. Also, it will reduce the chance of accidental happenings.
Work supervision, equipment utilization and construction procedures all must ensure the safety of the workers. Not only that, the plans need to be laid out in such a manner that the people using the building will not come under any foreseeable accident. Designers, planners, and engineers all must conform to well-established safety standards such as OSHA in order to ensure proper safety and security.
Let us see now the various facets of Concrete Formwork.
1. Supervision and Inspection: Proper supervision of work is of paramount importance while work is going on in order to ensure that all safety protocols are being obeyed. This comes active in times of formwork placement, concrete pouring, and formwork stripping.
Not only this, modifications in field on the falsework, erection procedure and forms should always be properly inspected first. Always, these should be done only after the principal designer has given the green signal to them. The load on the formwork needs to be sharply observed at all times lest it breaks down under excessive loads it was not designed to uphold.
2. Platforms and Access for Workers: For work required at elevated positions, worker-accessible platforms need to be raised. These platforms and the pathways to access them should be very carefully erected. Ladders need to have proper rest on solid structures at the top, or need to fastened in case they are very long.
Some of the particularly tricky structures such as bridges may require special scaffolding or safety nets in order to ensure proper access and prevention of accidents. These scaffolds, platforms, or other access means must conform with OSHA standards.
Unauthorized individuals, onlookers and loiters are not only a distraction to work, but they can actually bring or become trouble to everyone involved. To prevent this, barriers and safety signs need to be placed around the construction site from the very beginning of work.
Safety Plan for Concrete Formwork
~~~~~~~~~~~~~~~~~~~~~~~~~~
Published By
Rajib Dey
www.constructioncost.co
~~~~~~~~~~~~~~~~~~~~~~~~~~

Tuesday, March 3, 2020

About Precast Concrete Piles - the Pros and Cons

The most common type of them, a precast concrete pile is a deep foundation used to transfer loads from a upper, soft layer of soil to a hardar, capable lower layer. They can be rectangular, square, round or polygonal in shape. Extra reinforcements are provided in the concrete so as to provide support for the forces received before the instalent.
The precast concrete piles are constructed in a casting yard. Then they are transported to the required location and installed as necessary. They are constructed by pouring the concrete in a conventional reinforcement cage. This has several steel bars in horizontal and vertical positions, held together by individual or spiral ties.
Types of Precast Concrete Piles - There are two main categories into which we can divide:
1. Driven Precast Concrete Piles: It is precast in a construction yard and then hammered into the soft ground at the target location. At most they can go up to 40 feet deep.
2. Bored Precast Concrete Piles: After they are made in the construction yard, they are transferred to the target location. The location already has boreholes for the piles; they are just lowered into these holes. Any space remaining between the bore hole and the pile is grouted.
About Precast Concrete Piles - the Pros and Cons
~~~~~~~~~~~~~~~~~~~~~~~~~~
Published By
Rajib Dey
www.constructioncost.co
~~~~~~~~~~~~~~~~~~~~~~~~~~