Surveying is the art to create horizontal measurements for finding out the relative position of several objects on the surface of the earth.
Objective of surveying - To work from the whole to the part, To determine the new station by minimum two methods
Categorization of surveying:
1. Geodetic surveying: It is also known as trigonometrically surveying. In this type of surveying, the curvature of the earth is taken into consideration. It handles long distance and large area. The joining line in earth is curved and develops arc of a two point great circle.
2. Plane surveying: Plane surveying handles small area and short distances. The curvature is the earth and it is not taken into consideration. The line that is attached in two points in earth surface is considered as a straight line. Geodetic surveying is more accurate with regard to plane surveying.
Classification of surveying on the basis of instruments applied:
a. Chain survey
b. Compass survey
c. Theodolite survey
d. Plane table survey
e. Tachometric survey
f. Photographic survey
g. Aerial survey
Categorization of scales:
a. Plain scales
b. Diagonal scale
c. Comparative scale
d. Vernier scale
Well conditioned triangle: It is described as there is no include angle is under 30 and more than 120. Equilateral triangle is the superior conditioned triangle.
Jargon in chain surveying:
a. Survey station
b. Base line
c. Chain line
d. Tie line
e. Offsets
Categories of chains applied in surveying:
a. Metric chain
b. Non metric chain
c. Gunter’s chain
d. Engineers chain
e. Revenue chain
To get more details, go through the following link www.learntocivilfield.com

~~~~~~~~~~~~~~~~~~~~~~~~
Published By
Rajib Dey
www.constructioncost.co
~~~~~~~~~~~~~~~~~~~~~~~~
While going to estimate the cost of new concrete, different types of variables should be taken into consideration which range from surface prep, formwork, reinforcing materials, and finish work, as well as the cost of the ready-mix concrete.
It will compute the total price of the job. Costs for certain items will differ from location to location or from site to site, but a rough estimate can be obtained with some averaged amounts.
Cost Per Yard of Ready-Mix Concrete: The most vital item should be the price of concrete, whether ready-mix concrete or other concrete material is applied. As soon as the project specifications and job location are defined, get quotes from local ready-mix concrete suppliers.
Concrete pricing is generally quoted per cubic yard or cubic meter (metre). For an average estimating number, it is recommended to apply $77 per cubic yard.
Cost of Concrete Sub-Grade Work: When the concrete is placed over soil, it is required to grade or arrange the surface for the concrete. Pricing for this can contain expenses associated with grading, compacting soil, excavating, trenching, and other components.
As a perfect average, one can apply $65 per hour of work to set up the surface, provided that the surface is in excess of 75 percent leveled and no special work is required to set up the site.
Costs for Extra Sub-Grade or Site Work: When the surface is not leveled, it is required to include expenses for more site work, like excavating and filling with proper material or eliminating a soft spot on the terrain to prepare it for bearing structural loads.
Based on the distance from where the sand or any other suitable fill material will be arranged, it could include over $10 per cubic yard or meter to your estimate. The cost might be incurred for setting up polyurethane plastic or vapor barrier prior to set the concrete.
Cost of Concrete Formwork: Building concrete forms generally demonstrate a vital part of the total cost of concrete work, as it is one of the most labor-intensive features of the job. It is necessary to recognize the type of formwork to be applied, method of installation, and whether you will purchase or rent the form materials. Other related costs may involve a crane or other equipment applied to move the form materials, form release product, re-using form materials, and the cost to repair forms after different applications.
Usually, the cost of the formwork is $1.10 per square foot of the concrete area. This estimate is prepared for a square or rectangular area. The cost of formwork is increased for rounded or contoured concrete.
Cost to Finish Concrete: Concrete prices mainly differ on the basis of the type of finishing provided in the design. Concrete gets finished in various ways like smooth surface, exposed aggregate surface, or stamped concrete finish. Some surfaces need only a strike-off and screed to suitable contour and elevation, while for others surfaces, a broomed, floated, or troweled finish should be provided. To work out finishing in your concrete pricing analysis, you can include $0.75 per square foot or perhaps more, based on the complication of the specified finish. The cost of any curing compound or testing services should also be taken into consideration.
Cost of Concrete Reinforcement: Most concrete comprises of some type of reinforcement, like rebar, wire mesh, plastic mesh, or fiber which should be added to the concrete mix to raise the strength and crack-resistance. Standard reinforcing materials can include roughly $0.18 cents per square foot. This number is higher for large-diameter rebar or other special reinforcement.
 Read more
~~~~~~~~~~~~~~~~~~~~~~~~
Published By
Rajib Dey
www.constructioncost.co
~~~~~~~~~~~~~~~~~~~~~~~~
Concrete driveway construction is more beneficial as compared to conventional driveway construction methods. The concrete driveway is long-lasting.
Given below, the pros and cons of concrete driveway construction.
Benefits of Concrete Driveway Construction - The prime benefits of concrete driveway construction are as follow:
1. Quality Construction
2. Stability
3. Extreme Flexibility
4. Less Maintenance
5. Costs
6. Diverse range of options
1. Quality Construction: The concrete as a driveway material improves the quality of appearance. It offers a clean and professional view.
2. Stability: A concrete driveway that is efficiently constructed and properly preserved can endure for prolonged times. As a robust structural material, concrete can bear heavy traffic loads, corrosion and even other atmospheric vulnerabilities. To ensure long-lasting integrity, the perfect plan should be made for the formation of concrete in terms of mix design and construction joints that is based on the conditions of the site.
3. Offers Extreme Flexibility: The concrete driveways are suitable for different types of landscaping designs, or building layouts. It is recognized for both residential and traffic use.
The use of concrete driveway only improves the beauty of the property. The flexibility is sustained in respect of concrete driveway installation and the design variety it provides.
4. Less Maintenance: Due to extreme stability of concrete driveway, the maintenance work is minimized significantly. Like other pavement options, various problems like weeds, paver shifting etc are not found in concrete driveways. There is little or zero maintenance for concrete driveway.
If any stain is found over the concrete, it can be easily eliminated. It is just necessary to cleanse the surface annually with the use of proper stain cleaner.
The sealants can also be applied in concrete driveway construction to safeguard the surface from stains and other damages.
5. Costs: Here the cost is associated with construction cost and maintenance cost. The initial cost of concrete driveway construction is cheap but it is adjusted with the zero-maintenance cost it offers.
A good concrete driveway constructed can sustain for 20 to 25 years with zero maintenance that yields huge savings in cost in due course of time.
6. Variety of Options: The concrete driveway construction comes with various types of design options. Either a slab look, or paver look (stamped concrete), or polished look (Polished concrete) can be arranged on the basis of the requirement.
Drawbacks of Concrete Driveway Construction - The following drawbacks are found in concrete driveway construction:
1. The application of polished or stamped concrete driveway construction is little bit expensive with regard to the normal concrete driveway construction. To maintain the longevity, special maintenance are essential for these types.
2. It is required to appoint professionals and skilled labors for pouring concrete to driveway construction. The process becomes very complicated when executed as a DIY project.
3. It is suggested to utilize sealants for annual Maintenance so that the concrete driveway slabs last for a long time.
 Read more
~~~~~~~~~~~~~~~~~~~~~~~~
Published By
Rajib Dey
www.constructioncost.co
~~~~~~~~~~~~~~~~~~~~~~~~
Shuttering stands for a temporary structure formed to retain wet concrete that is poured in it to produce roofs and concreting walls in building structures.
It supports and retains the liquid concrete until it achieves the required strength and shape. When the structure becomes sufficiently strong to bear its load, this temporary structure is detached.
How to measure the shuttering area:
The calculation of shuttering is done with sq.m in the rate analysis of shuttering. To measure the area of shuttering, it is required to know the process for working out peripheral length (perimeter) of an any shape.
Peripheral length (Perimeter):
Perimeter belongs to the span around a two dimensional shape.
Given below, some vital formulas for measuring the shuttering area:
Perimeter of Square : 4S (S denotes Length of each side)
Perimeter of Rectangle : 2[L+B] (L & B denotes length & breadth)
Perimeter of Circle : 2πr (r denotes radius of circle)
Area of Rectangle = Length x Breadth
Area of Square = Side x Side
It should be kept in mind that each member in a structure ranging from slab or beam or column contains six sides (faces). The measurement for shuttering area is done with two methods. One is done with formula and other is by measuring the specific areas of faces.
The following formula is used :-
Shuttering area = Peripheral length (Perimeter) x Depth
Computation of shuttering area of a column
Suppose, the column shuttering is performed on four sides.
Top face of the column is discarded for pouring concrete & the bottom face is secured to ground level. Here, the calculation should not done for top & bottom faces.
Toward column, shuttering is carried out for four sides and the other two sides.
The side of column remains in rectangular shape having side length as l and breadth as b.
Peripheral length of rectangular = l+b+l+b = 2l + 2b
Shuttering area = peripheral length (perimeter) x depth
Peripheral length = 2x0.8 + 2x0.6 = 1.6 + 1.2 = 2.8 sq.m
So, total area of shuttering for a column = 2.8 x 4 = 11.2 sq.m
When the shape of column is circular, then the following formula is used to work out the shuttering area.
2πr x Depth
Measurement of shuttering area for a beam
The shuttering is provided on five sides for a beam.
In beam, the top face is departed to fill concrete. Therefore, no shuttering is arranged on top face.
The calculation is done by determining the separate area of each faces as follow :-
Face 1 : Area of rectangle = L x B = 0.8 x 4 = 3.2
Face 2 : Area of rectangle = L x B = 0.6 x 4 = 2.4
Face 3 : Area of rectangle = L x B = 0.8 x 4 = 3.2
Face 4 : Area of rectangle = L x B = 0.8 x 0.6 = 0.48
Face 5 : Area of rectangle = L x B = 0.8 x 0.6 = 0.48
Total Area of Shuttering = 3.2 + 2.4 + 3.2+ 0.48 +0.48 = 9.76.Sqm
Measurement of Shuttering Area of a Slab:-
Slab is supported on beam, hence, shuttering is not required on four sides. The top of the slab is also departed to fill concrete and for curing. Hence, shuttering is arranged to the bottom of slab.
Shuttering area of Slab = Bottom area of slab = L x B
Bottom Area = 5 x 4 = 20 Sq.m
 Read more
~~~~~~~~~~~~~~~~~~~~~~~~
Published By
Rajib Dey
www.constructioncost.co
~~~~~~~~~~~~~~~~~~~~~~~~
Definition for Nominal Mix: The concrete is extensively applied as construction materials and several mixes of fixed ratio are now being used with concrete to retain adequate strength. These mixes are known as nominal mixes.
Under normal situation, it contains margin of strength over that specified.
Nominal mix concrete is applied for concrete of grades M5, M7.5, M10, M15 and M20.
Ratios of ingredients in nominal mixes
The ratios of materials for nominal mix should be as follow:-
Grade : Ratios (C, FA, CA)
M5 : 1:5:10
M7.5 : 1:4:8
M10 : 1:3:6
M15 : 1:2:4
M20 1:1.5:3
With 1:1.5:3 ratio, it signifies that these should be measured as 1 kg of cement, 1.5 kg of fine aggregate and 3 kg of coarse aggregate.
But, usually they are selected on the volume basis and multiplied with 1.55 constant (in Nominal Mix Concrete Calculation) to obtain the bulk volume of the material.
Design Mix Concrete: The concrete mix created under quality control on the basis of the strength, durability and workability is known as the design mix.
Prior to arrive at the mix ratio, several other factors should be taken into consideration which range from accessibility of equipment for compaction, curing process selected, type of cement, quality of fine and course aggregate etc.
The design mix or controlled mix is extensively utilized for different types of vital structures due to superior strength; curtailed inconstancy; leaner mixed with consequent economy and improved quality.
In design mix, the concrete is formed in weight basis especially for greater volume where the load is vital. It is required to examine each and every property of the ingredients mentioned below.
Weight of each ingredient
• Brands
• Mix Proportions
• Type of exposure
• Properties of Cement: Initial & Final Setting Time, Specific gravity, Cement Grades
• Properties of Fine & Coarse Aggregates - Particle Size, Silt Content, Unit Weight, Fineness Modulus, Crushing Value
On the basis of the above things, the mix design will be set up as per requirements and then examined with trail mix. As soon as the trial mix is examined and passed on 7th & 28th Days for compressive strength, then it will be ready for batching and execution at the site level.
 Read more
~~~~~~~~~~~~~~~~~~~~~~~~
Published By
Rajib Dey
www.constructioncost.co
~~~~~~~~~~~~~~~~~~~~~~~~
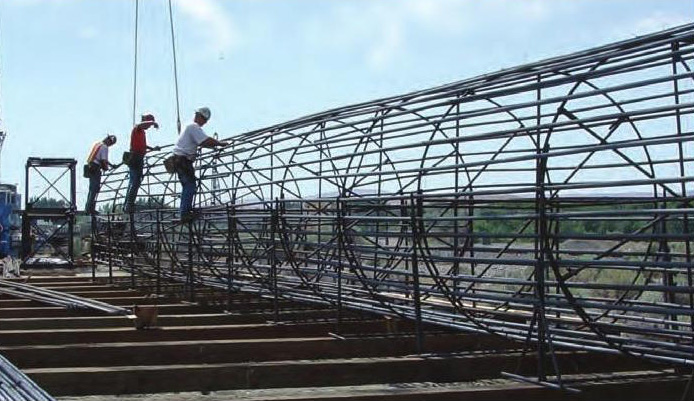
In drilled shaft construction, rebar cages are generally utilized to reinforce the shaft throughout excavation. To retain the strength of this cage as well as complete the entire construction project successfully, the design of the cage should be perfect.
Normally, a rebar cage for a drilled shaft comprises of longitudinal bars which are allocated with uniform spacing along the boundary of a cylinder.
In order to reinforce these bars, steel is arranged transverse to the bars and connected with ties, clamps or welds. Other elements of rebar cages may contain hoops for sizes, guides for centering the cages in the borehole and the premie inside of the cage, and stiffeners and pickup devices applied to facilitate lifting the cages.
Larger cages should contain temporary or permanent strengthening components to get rid of permanent distortion due to the stresses of lifting and placing.
As rebar cages are vital drilled shaft construction, it is essential that these cages should be properly constructed on the basis of a calculation of the stresses that it will endure.
The amount of reinforcing steel in a rebar cage should adhere to the structural requirements, taking into account combined stresses of axial load, lateral load and moment.
Properties of Steel Used for Rebar Cages
The American Society for Testing and Materials (ASTM) defines various steels which are employed for reinforcing drilling shafts.
The American Association of State Highway and Transportation Officials (AASHTO) approves most of these ASTM steels for being applied in building rebar cages for drilled shaft construction.
Normally, the steel accessible for these cages is AASHTO M 31 (ASTM A 615) in Grade 40 or Grade 60. If welding is required, then weldable steel, like ASTM A 706, should be utilized.
In case, there is risk for corrosion, galvanized or epoxy-coated steel are useful for longitudinal and transverse reinforcement. This is often stated for marine environments where the chloride content of ground or surface water is extreme.
As nicks and blemishes in the coating may happen at the time of the lifting and disposition of the rebar cases, rapid corrosion may occur. Under this situation, rebar without epoxy should be utilized and the drilled shaft should be filled with a low-permeability concrete to enhance the resistance strength against corrosion.
In unusual situations, high strength reinforcement is suitable. It may comprise of threaded couplers for splice connections and higher-strength rebar.
Contractors should compute the structural requirements of a drilled shaft cautiously while deciding the requirements of a rebar cage.
To get more details, go through the following articlewww.pilebuck.com
~~~~~~~~~~~~~~~~~~~~~~~~
Published By
Rajib Dey
www.constructioncost.co
~~~~~~~~~~~~~~~~~~~~~~~~
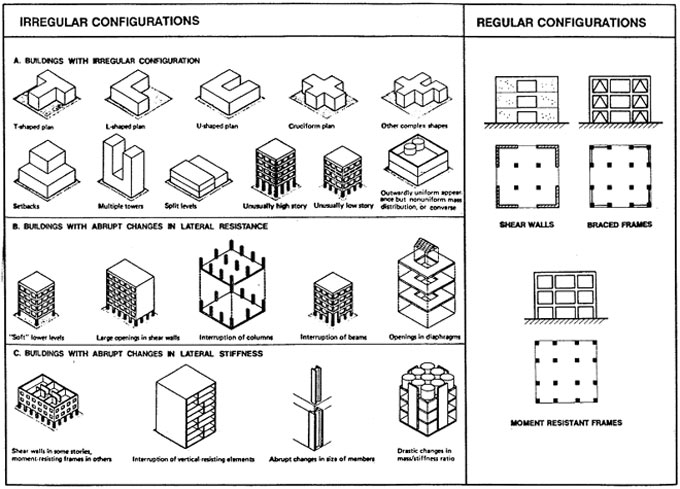
The mass of the building to be designed manages seismic design apart from the building stiffness, since earthquake produces inertia forces which are proportional to the building mass.
If the buildings are designed to function elastically throughout earthquakes devoid of any damage, the project becomes economically illogical.
Because of this, it is essential for the structure to endure damage and thus disperse the energy input to it throughout the earthquake. So, the conventional earthquake-resistant design philosophy needs that normal buildings should have the capacity to withstand earthquake.
Minor (and regular) shaking with no damage to structural and non-structural elements.
Moderate shaking with small damage to structural components, and some damage to non-structural elements.
Extreme (and unusual) shaking with damage to structural components, but with NO collapse (to save life and property inside/adjacent to the building.
SEISMIC DESIGN FACTORS: The following factors provide a great impact on the building design. Serious attentions should be given in the design phase.
Torsion: Objects and buildings contain a center of mass i.e. a point by which the object (building) is balanced devoid of rotation taking place. If the mass allotted consistently then the geometric center of the floor and the center of mass may meet.
If the mass is allotted unequally, the center of mass is placed outside of the geometric center and it leads to "torsion" producing stress concentrations. A specific amount of torsion is indispensable in each building design. If the masses are organized uniformly, it will lead to balanced stiffness against either direction and maintain torsion within a agreeable range.
Damping: Usually, the buildings are poor resonators to dynamic shock and disperse vibration by engrossing it. The natural vibration is consumed with damping.
Ductility: Ductility is the property of a material (like steel) to bend, flex, or move, but fails due to happening of significant deformation. Non-ductile materials (like weakly reinforced concrete) fail unexpectedly by crumbling. It is possible to attain superior ductility with carefully detailed joints.
Strength and Stiffness: Strength is a property of a material to defy and tolerate applied forces within a safe limit. Stiffness of a material refers to a degree of resistance to deflection or drift (drift being a horizontal story-to-story relative displacement).
Building Configuration: This term defines a building's size and shape, and structural and nonstructural components. Building configuration establishes the way seismic forces are circulated within the structure, their relative magnitude, and problematic design concerns.
 Read more
~~~~~~~~~~~~~~~~~~~~~~~~
Published By
Rajib Dey
www.constructioncost.co
~~~~~~~~~~~~~~~~~~~~~~~~
Post & Lintel is an easy form of construction that includes posts to bear horizontal beams or lintels found in timber-framed work or in columnar and trabeated architecture.
Stonehenge is a good example of post and lintel construction.
Post & Lintel System:
1. Post lintel belongs to a frame structure.
2. It is made of concrete materials by blending aggregates, gravel, sand and cement with water.
3. It is light weight or heavy weight structure.
4. The proportion of mixing comes as 1:2:4, 1:3:6 & 1:1.5:3 etc.
5. Currently, it can be utilized to form steel with regards to several codes and specifications like 80ksi, 60ksi & 40ksi.
6. 60ksi steel is mostly found.
Characteristics of post & lintels:
a. Post & lintels are illustrated as frame structure but columns and louvers.
b. Solid and void relationship is minor.
c. The invert beam is visible from above.
d. Existence of continuous beam.
e. The columns are arranged along the age of the building.
Benefits of post-lintel:
1. Post lintel structure in the outside facades enhances the appearance of the building.
2. Often, the enormous or inflexible masses are handled gently with the use of formwork of the post lintel to provide an elegant appearance.
3. Bigger space (column to column distance) of building can be designed in this system.
4. For the greater extent, the height of the lintel gets larger and for this a large distance appears as small due to the unavailability of clear height.
5. Sometimes, this issue produces visual disruption that can be resisted in flat slab.
6. The construction cost of this system is quite elevated for the laborious casting process of beam and slab and the application of R.C.C
7. The maintenance cost of this system is low as compared to other structural system because of it’s endurable characteristics.
8. Ingression of heat gets decreased in this system since the heat is transmitted from the slab to beam and then from beam to floor.
9. The control of openings allows the fewer amount of heat in the building.
10. Because of free flowing plan, the light and ventilation can easily be entered into the building.
11. This structural system contains less self-loads that can minimize the risk of earth quake.
12. The system can resist buckling or bending effect of the building from the powerful wind flow.
13. The system has good fire resistance strength for the construction material (R.C.C).
14. The system has fewer scope of failure as compared to other structural system.
 Read more
~~~~~~~~~~~~~~~~~~~~~~~~
Published By
Rajib Dey
www.constructioncost.co
~~~~~~~~~~~~~~~~~~~~~~~~
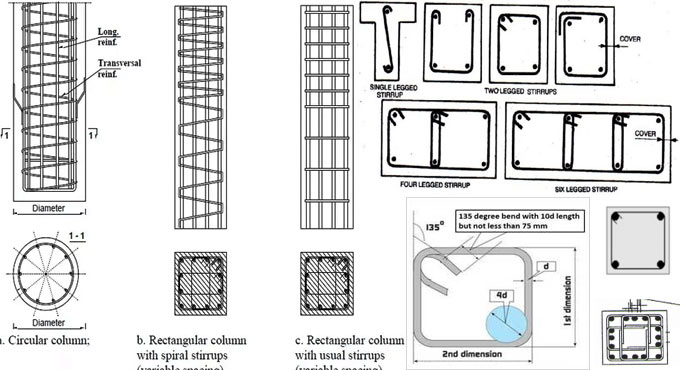
The design of stirrups for column is created on the basis of different factors like changeable cross-sections, the number of longitudinal reinforcement bars and the load bearing strength. Stirrups in column construction are generally called as vertical ties or transverse reinforcement.
The following types of stirrups or ties are found in column construction:
1. Helical Reinforcement: The helical reinforcement is different from the lateral ties since the lateral ties contain spacing among individual ties. In helical reinforcement, the quantified value is pitch, rather than spacing.
The helical reinforcement offers more ductility and flexibility to the built up column with regard to lateral ties. They can effectively support the longitudinal reinforcement. With the insertion of helical reinforcement, the resistance capacity of the column structure against buckling become superior.
a) Ambient temperature of 27 °C (80°F) or greater; and
b) Evaporation rate that surpasses 1 kg/m2/h
The helical reinforcement is also applied as spiral reinforcement. Helical bars are suitable for seismic design. By the influence of seismic loads, the concrete affixed to the helical reinforcement is stripped off preliminary. It facilitates to give a warning sign concerning the structural condition of the column.
The helical reinforcement is a perfect example in respect of uniformly distributing loads as compared to the normal rings (lateral ties).
2. Lateral Ties: The lateral ties stand for transverse reinforcement to develop a separate ring with a fixed spacing among each link. Based on the column cross-section and the number of vertical or longitudinal reinforcement bars applied, the lateral stirrups vary from two-legged stirrups, four-legged stirrups or six-legged stirrups etc.
Given below, the detail information on various lateral tie configurations for several number of vertical reinforcement bars. The configurations are dependent on the ACI 315-99 recommendations.
1. Lateral Tie Configuration for 4- Bars: The tie is configured for 4 numbers of vertical column bars. It is a standard type of configuration applied for simple column design. This configuration is known as 2 legged stirrups column type.
2. Lateral Tie Configuration for 6- Bars: The first arrangement is observed when the spacing of vertical bars are under 150mm ( below 6”). If the spacing is in excess of 150mm, the second arrangement is observed where crossties are used.
3. Lateral Tie Configuration for 8- Bars: The first arrangement is done with the standard 8 number vertical reinforcement arrangement. Here the spacing is under 6”. If the spacing is in excess of 150mm, two crossties are utilized.
The third arrangement is known as bundled bars arrangement. Under this arrangement, two bars are combined at the corners. So, no cross ties are required. Highest 4 numbers of bars are combined.
4. Lateral Tie Configuration for 10- Bars: In this case, it is required to provide cross-ties apart from the square ties. It is also organized in bundled bars. Here bundle of 2 bars is arranged at four corners and two remaining bars are supported with the help of cross ties.
5. Lateral Ties for different column cross sections: The arrangement for 16 bars employ diamond ties. The process is very complicated to fabricate diamond ties perfectly and as a result it is ignored. The process is also complicated to arrange them properly. This tie arrangement is not suggested by ACI 315 because of the complications related to it. But, in some countries, standards utilize this arrangement for simple column design.
In A 16 bars column arrangement according to ACI 315 4 bundled bars can be arranged at each corner.
 Read more
~~~~~~~~~~~~~~~~~~~~~~~~
Published By
Rajib Dey
www.constructioncost.co
~~~~~~~~~~~~~~~~~~~~~~~~
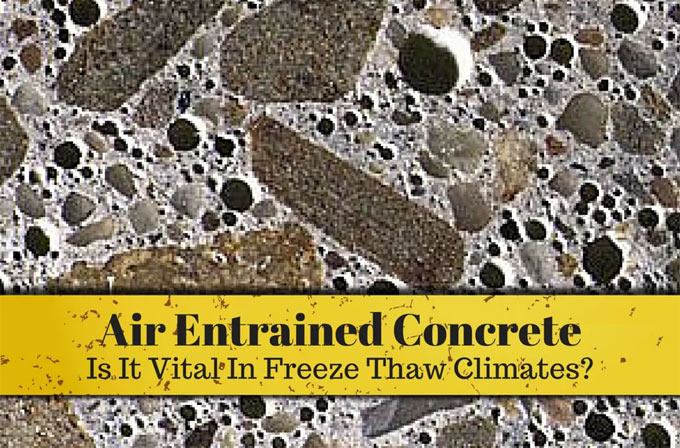
Air entrainment is the formation of tiny air bubbles in concrete. The concrete produced with this method is called air entrained concrete.
Air entrainment is provided in concrete with air entraining Portland cement or air entraining agents like admixture. The amount of air in such concrete generally remains among four to seven percent of the volume of concrete.
It is calculated with galvanometric method, volumetric method and pressure method. The air bubbles lessen internal pressure on the concrete by arranging chambers for water to spread when it freezes.
The objective of air entrainment is to enhance the strength of the hardened concrete, particularly in climates prone to freeze-thaw as well to raise workability of the concrete while in a plastic state.
Method - In the following ways, the air is entrained into the concrete:
1. By applying gas forming materials like aluminium powder, zinc powder and hydrogen peroxide.
2. By applying surface active agents that minimizes surface tension. They range from natural wood resins and their soaps, animal or vegetable fats or oils, alkali salts of sulfonated or sulphated organic compounds.
3. By applying cement dispersing agents.
Advantages - Given below, some of the advantages of the entrained concrete:
a. Workability of concrete is raised.
b. Impact of freezing and thawing is decreased significantly.
c. Bleeding, segregation and laitance in concrete are also minimized.
d. Entrained air makes the strength of concrete better against sulphate attack.
e. Minimizes the chance of shrinkage and crack development in the concrete surface.
Drawbacks - Given below, some of the drawbacks of air entrained concrete:
1. The strength of concrete is reduced.
2. The application of air entraining agent enhances the porosity of concrete and as a result the unit weight is decreased.
3. Air-entrainment in concrete should not be accomplished if the site control is not proper. It occurs as the air entrained in a concrete fluctuates with the alteration in sand grading, errors in proportioning and workability of the mix and temperatures.
 Read more
~~~~~~~~~~~~~~~~~~~~~~~~
Published By
Rajib Dey
www.constructioncost.co
~~~~~~~~~~~~~~~~~~~~~~~~
Quantity Surveyor: The prime intention of the quantity surveyor is to measure the amount of materials required for building work as well as estimate the cost of the materials.
Usually, a quantity surveyor performs the following activities :-
• Commercial omission of site
• Formulation of financial reports, budgets and forecasts
• Supervision, training and development of some junior staff
• Job review of assistant staff
• Utilization of health and safety requirements
• Fulfillment of paperwork as desired by the CSIs/procedures
• Synchronization of enquiries for and evaluation of subcontractors (in conjunction with designers, buyers and other disciplines as required)
• Assuring that all subcontract documentation effectively describes the detailed requirements
• Insurance cover (quotations and implications)
• Calculation and disclosure of monthly valuation for certificate
• Preparation of claims, variation orders and day work
• Settlement of new rates for supplementary works
• Calculation of finished work and validation of compliance with specified requirements for subcontractor payment.
Quality Manager: The purpose of the quality managers is to make sure that the product or service that an organization renders is suitable for purpose, reliable and satisfies both external and internal requirements.
A quality manager undertakes the following responsibilities :
• Offers technical guidance on construction materials
• Provides instructions to line management on quality management matters helping agents or project managers with the formulation of their quality plans for individual projects
• Inspecting the execution of quality systems with regard to the CSIs/procedures by audit and surveillance, and instructing proper management of any corrective actions necessary and supervising their implementation
• Implementing or arranging audits on vendors, suppliers and subcontractors in association with purchasing managers
• Guiding all staff on their quality management responsibilities.
 Read more
~~~~~~~~~~~~~~~~~~~~~~~~
Published By
Rajib Dey
www.constructioncost.co
~~~~~~~~~~~~~~~~~~~~~~~~
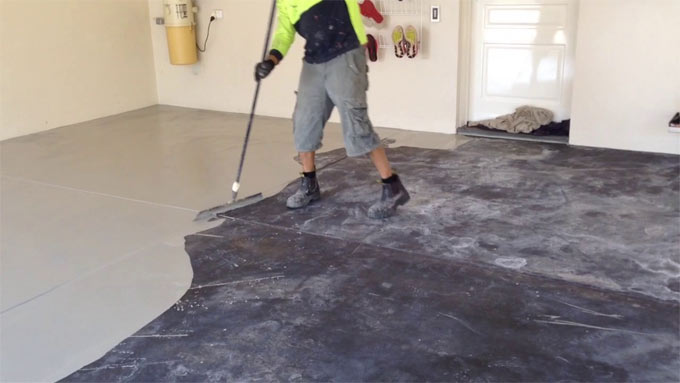
Self-leveling overlays are set up rapidly. It is possible to place and finish more product each day, each worker as compared to any other cast-in-place decorative product.
Self-leveling overlays become effective when substrate conditions are less than standard: obsolete or worn concrete surfaces, unflat or unlevel floors, and concrete surfaces getting damaged with other floor treatments.
Self-leveling overlays are normally used in commercial building lobbies and corridors, retail spaces, residential floors, restaurants, and warehouse floors.
Self-leveling overlay products are susceptible to atmosphere conditions. Due to this, most applications are kept in controlled indoor environments. Specific jobsite conditions should be administrated with the purpose of attaining the following results :-
• Keeping uniform temperature
• Managing air movement to remove drafts
• Protecting from the direct sunlight to the work area
• Maintaining even relative humidity all through the jobsite
There should be a good bond among the subfloor and an overlay, so exact mechanical preparation of the accessible slab is vital. Bead-blasting equipment and diamond grinders are commonly applied tools but scarifiers are also utilized, particularly for thicker placements. The size of the required equipment is based on the size of a project concerning productivity.
Self-leveling overlay products are formed by mixing cement, fine aggregates, pozzolans, and admixtures comprising of superplasticizers, polymers, shrinkage compensators, and other components. Manufacturers' mixing instructions need applicators to mix a proper amount of water with each bag of material to attain the desired properties.
Initially, the material is placed on a sub slab, the average working time is only about 12 minutes, accompanied quick strength formation. Regular application thicknesses commence at about ¼ inch but can go beyond 2 inches devoid of shrinkage or cracking problems.
The toughened product is very solid and long-lasting and it contains compression strengths of roughly 6000 psi, and attains good flexural strengths.
When inherent colors are added to self-leveling overlays, the final product demonstrates strong color devoid of any efflorescence.
To get more details, go through the following link www.concreteconstruction.net
~~~~~~~~~~~~~~~~~~~~~~~~
Published By
Rajib Dey
www.constructioncost.co
~~~~~~~~~~~~~~~~~~~~~~~~