adsense analytic

Wednesday, February 19, 2020

What is Caisson Foundation and How is it Used in Construction

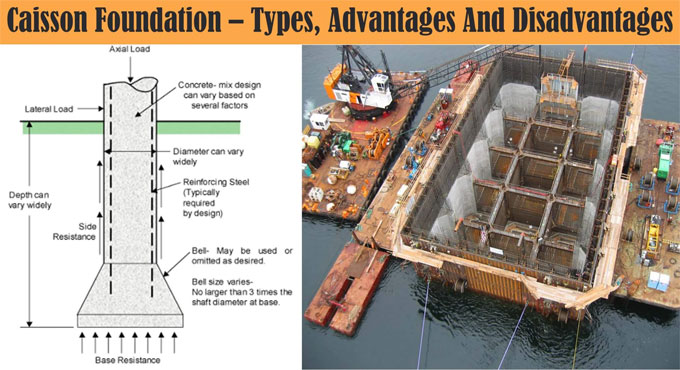
A Caisson Foundation is basically a watertight box with the top open. It is sunk into water to gain access to the bed of the stream. It is generally made of wood, steel or concrete depending upon project requirement.
Through this boxlike chamber, the workmen can make construction work at the bottom of water bodies without being hampered by the water. Accordingly, this is mainly used to place foundations at river beds.
Caissons are generally made on shore first. Then, They are launched into the water body. The caisson is then floated to the designated spot. Then they are sunk vertically to the bottom. After ensuring that the caisson is waterproof, the water inside is pumped out to dry.
Types of Caisson Foundation:
1. Box Caisson: This is the most basic type of caisson. It is made of timber, concrete or steel. It is built on shore and floated to the foundation location and sunk to the bottom. It is basically a box without the top.
2. Open Caisson: This type of caisson has neither the top nor the bottom. When made in a cylindrical shape, it looks like a well without top or bottom. It can be built in many shapes - vertical, over, or any other option.
In case of building large bridges, a bathtub-like shape is preferred. Usually open caissons are made of steel plates welded together. RCC can be also used here, as the situation requires.
3. Pneumatic Caisson: This odd type of caisson has an open bottom but closed top. This has to be forced down to the bottom of the water by means of compressed air. Thus the name is derived. A pneumatic caisson consists of a working chamber, a shaft, and an airlock. The caisson is made of inner and outer layer of steel skins. Trusses and girders join them to form a boxlike structure.
The working chamber in pneumatic caissons is 3-4 meters tall only. It is made airtight with a special seal on top. The caisson’s bottom edge has a steel edge that cuts into the riverbed. All this facilitates working within the chamber while the caisson is being sunk. People can access the caison via the airlock.
What is Caisson Foundation and How is it Used in Construction
~~~~~~~~~~~~~~~~~~~~~~~~~~
Published By
Rajib Dey
www.constructioncost.co
~~~~~~~~~~~~~~~~~~~~~~~~~~

Friday, February 14, 2020

What are Shear Keys and How to Use Them

A building and structure has to bear not only vertical loads, but also lateral loads. This can occur due to many design or natural reasons. To counteract this lateral load, Shear Keys are used. Let us see today what exactly are shear keys and how can you use them in your construction.
A building can face a lot of lateral load due to many reasons. Some of these include earthquake loads, sliding forces, water pressure, wind pressure etc. This often occurs with bridges, retaining walls, basements, extremely tall buildings, precast buildings and culverts, masonry walls where seismic activity is stronger, and steel columns and piers.
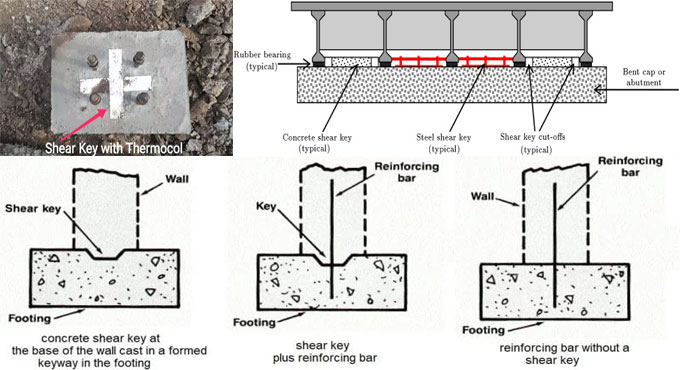
Shear keys can be constructed by concrete in precast buildings, and of steel in steel structures. Sometimes, steel reinforcements are made to play the part of shear keys as well. They improve the lateral stability of a building.
Placement of Shear Keys: Where the shear keys will be placed differs a lot depending upon the structure they need to support. Let us discuss them below.
Bridges: In small to medium bridge structures, shear keys are placed in the abutments of the bridge. This provides lateral transverse support to the structure above during sidewise movement.
During an earthquake or similar strong lateral force application, the shear keys act as a sacrifice. Therefore, the strong seismic forces are prevented from entering the abutment piles.
They act better when they are placed on the outer side of the bridge. However, this makes them difficult to inspect or repair.
Retaining Walls: You should place shear keys at the base of retaining walls, just beneath the stem. This prevents sliding of the base during strong lateral force application.
The shear keys placed beneath the wall must be nearly twice in width than their depth for the best performance. Generally, they are 508mm by 381 mm, respectively.
What are Shear Keys and How to Use Them
~~~~~~~~~~~~~~~~~~~~~~~~~~
Published By
Rajib Dey
www.constructioncost.co
~~~~~~~~~~~~~~~~~~~~~~~~~~
Wednesday, February 12, 2020

What is Plane Table Surveying

Plane Table Surveying is used in ad-hoc surveying and designing situations. In this, survey fieldwork and plotting work is done simultaneously. Therefore, there is no need for office work. This is best adapted to situations where high precision is not required. Thereby, it is greatly useful for small-scale mapping operations.
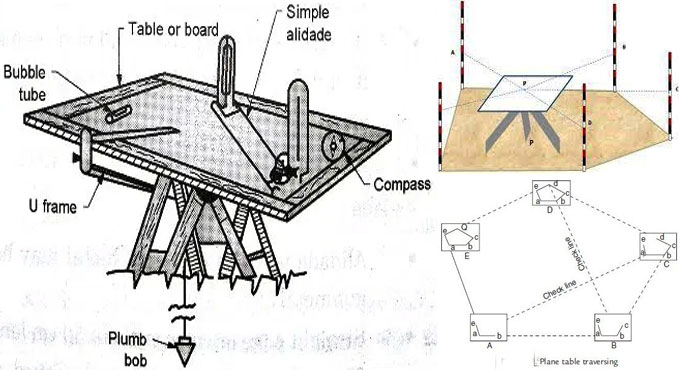
Instruments used in Plane Table Surveying - The Plane Table survey method uses very simple instruments. These are available everywhere.
1. Drawing Board: It is a board made of seasoned wood. They are available in many sizes. Generally, the field work is done in 40 cm by 30 cm boards. They also use the 75 cm by 60 cm boards, for larger work. In the field, a tripod is placed under the board with a ball socket in it. This enables the surveyor to draw on the board from any angle.
2. Alidade: An alidade is basically a ruler with a telescope. This is used on the drawing board to draw lines and rays according to the field. The alidade may also have a spirit level on it.
3. Compass: A tough compass is used to find the magnetic meridian of the place. Generally, the compass used in survey work also has two bubble tubes at right angles to each other.
4. Plumbing Fork: It is a rod with a plumbob attached to one end. This is used to ensure that other equipment is aligned perfectly vertically, when needed.
5. Spirit Level: It is a tube of liquid with a bubble inside it. The tube is slightly bulging in the middle. This lets the bubble stay in the middle of the tube when the level is perfectly horizontal. This is used to make sure the drawing board, or other equipment are placed horizontally.
6. Waterproof cover: A waterproof cover is used to cover up the paper on the drawing board from rain or other splashes and dust. This is generally made of soft polythene.
What is Plane Table Surveying
~~~~~~~~~~~~~~~~~~~~~~~~~~
Published By
Rajib Dey
www.constructioncost.co
~~~~~~~~~~~~~~~~~~~~~~~~~~

Monday, February 10, 2020

Using Light Gauge Steel Frames in Construction

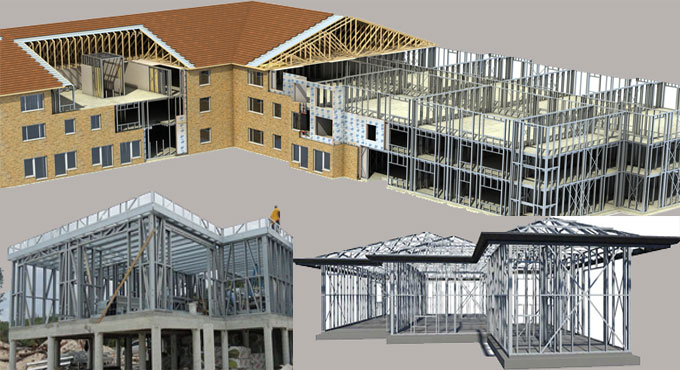
There is a new construction method on the market, and it is quite cool. Called the Light Gauge Steel Frame Construction, it is successfully replacing the standard wood frame construction method. This innovative method is being widely accepted in many building designs and construction aspects.
The Light Gauge Steel Frames offer several advantages. Some of them are design flexibility, strength, sustainability, buildability, etc. This makes Light Gauge Steel Frames easier to build and much safer too. Not only that, it is also faster to build. Word to the wise, though - the light steel frame is susceptible to fire, so fire protection coating needs to be provided.
Based on ASTM standard A1003, Light Gauge Steel Frames are manufactured from structural steel sheets. These sheets are formed into ‘C’ ‘Z’ and ‘S’ shapes. This makes the structure strong and able to support heavy loads. It is also called cold formed steel. This is because of the process by which it is manufactured.
This added strength and flexibility leads Light Gauge Steel Frames to support increased spans. They can be shaped into custom openings. Moreover, they can support many different types of external facade treatments. This sheer versatility is making the Light Gauge Steel Frames very popular among modern constructors.
One thing to be noted about Light Gauge Steel Frames is they are much more susceptible to corrosion effects than standard wooden frames. For this reason, they have to be provided with zinc, aluminum or combo coatings to make them corrosion-resistant over long periods.
Using Light Gauge Steel Frames in Construction
~~~~~~~~~~~~~~~~~~~~~~~~~~
Published By
Rajib Dey
www.constructioncost.co
~~~~~~~~~~~~~~~~~~~~~~~~~~
Saturday, February 8, 2020

External Plastering Work Checklist - To follow in Building Construction

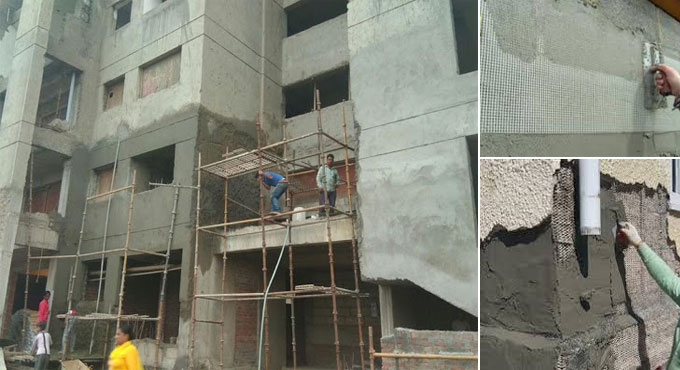
The external plastering work in a building project is a pretty important work because it provides the outer finish of the building. Not only that, it is the foundation for the building’s aesthetics. For these reasons, every constructor should keep in mind some basic steps in order to do it right. As such, the following checklist can be very helpful in external plastering work in building construction.
1. Clean the surface: Make sure that the external surface of the building is clean. That means the block or brick masonry and concrete surface. These should be clear of dust, oil grease, loose materials, mortar dropping, nails, wood, metal strips, etc. You should have an even, smooth surface to work on. Otherwise the bonding will not work.
2. Make scaffoldings: You need to erect a scaffolding in order to reach the entire outside surface. Conversely, you might be needing a double scaffolding as well. You have to do this without making a hole in the wall. Since in this phase you must not damage the wall in any way. However, if authorities permit, you can take support from other parts of the building.
3. Mortar and socketing: The gaps between the masonry and the beams that show on the outside needs to be filled with rich mortar. Also, you need to finish out the socketing works.
4. Chicken mesh: Then, fix a chicken mesh on the joint of RCC and masonry wall. The mesh should be 6 inches wide. Nail this mesh at 230mm intervals only.
5. Plumb measure: Use the plumb (also the line) from top to bottom to ensure the accuracy of the plastering.
The plastering here should be of a single coat of 10-12mm only. Also, you must check all the edges.
6. Handle jutting out stuff: Sometimes, a beam or a column, or other parts of construction may be budging out of the plastering. In this case, first take approval of the designer to see if you can break it off. If you can, then use a sharp chisel or hammer to break off the jutting-out portion. Also, you can use a concrete breaker in this. Do take care that it doesn’t hurt any other part of the building.
External Plastering Work Checklist - To follow in Building Construction
~~~~~~~~~~~~~~~~~~~~~~~~~~
Published By
Rajib Dey
www.constructioncost.co
~~~~~~~~~~~~~~~~~~~~~~~~~~
Friday, February 7, 2020

How to avoid Honeycombing in RCC Structures

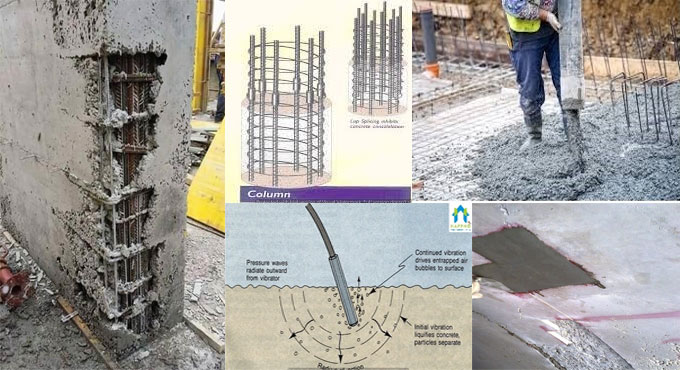
Definition of a honeycombing: Honeycombing refers to a structural fault in a RCC Structure. Honeycombed surface is the areas of the concrete surface where the coarse aggregate are eminently observable.
If precaution is not taken for honeycombed surface, the RCC structure fails to achieve optimal performance according to its design (structurally weak). Besides, it also lets damaging agents like contaminated water and air entering through the produced voids which can impact the strength of structure considerably.
Causes for Honeycombing: Honeycombing in RCC Structure is happened because of the following reasons -
1. Concrete mix is not homogenous.
2. The applicability of concrete is inadequate and not matched with its placement need.
3. Inadequate compaction to concrete.
4. Concrete flow is not dispersed to all corner due to steel congestion.
5. Concrete is set afore time prior to placing.
6. High free fall of concrete, at the time of pouring
7. Form work is not waterproof or inflexible.
8. Incorrect detailing and/or fixing of steel
How Honeycombing in Concrete can be avoided?
Check concrete production/cohesiveness from time to time to organize all concrete batches.
Tip: If it is possible to create ?ball? from the fresh concrete, a cohesive concrete mix is produced.
Concrete workability should tally with the placement need. As for example, a lightly reinforced column should contain 75mm slump, a heavily reinforced column may require 150mm slump.
Make sure that the compaction of placed concrete is perfect, vibrators should have been detached as big air bubbles stops to come out (over vibration can lead to bleeding). Various sizes (25mm, 40mm, and 60mm) of vibrator needle should have been utilized according to RCC sections.
How to avoid Honeycombing In RCC Structures
~~~~~~~~~~~~~~~~~~~~~~~~~~
Published By
Rajib Dey
www.constructioncost.co
~~~~~~~~~~~~~~~~~~~~~~~~~~