adsense analytic

Wednesday, June 19, 2019

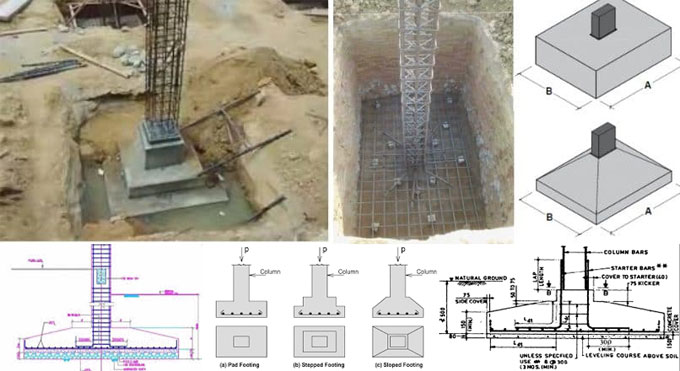
ACI 318-14 approved design guidelines of isolated footing

Isolated alias single footing is utilized to provide support to single RCC columns. It is cost-effective and suitable when the columns are placed at comparatively long distances, loads operating on footings are less and the safe bearing strength of the soil usually remains high.

Isolated footing is categorized as pad footing and sloped footing.

The isolated footing is arranged underneath the column to disperse the loads securely to the bed soil.

The design of isolated footing is made for the following purposes :-

Area of footing

Thickness of footing

Reinforcement details of footing with a satisfactory moment and shear force review.
The design of isolated footing is made on the basis of the guidelines set by ACI 318-14.

1. The compressive strength of concrete should satisfy the needs for both strength and stability. As per ACI 318-14, least concrete compressive strength should be 17MPa for normal applications.

2. With adherence to ACI 314-14 section 20.2.1.1, the deformed type steel bars should be used.

3. Factored forces and moments provided at the base of columns are transmitted to the foundation with reinforcement, dowels, anchor bolts, or mechanical connectors.

4. There should be least reinforcement even if the concrete bearing strength is not crossed.

5. Adequate anchorage should be arranged for tension reinforcement if reinforcement stress is not directly relative to the moment like in sloped, stepped or tapered foundation.

6. There should be sufficient anchorage length of both flexural and dowel reinforcement to get rid of bond failure of the dowels in the footing and to resist failure of the lap splices among the dowels and the column bars.

7. As per ACI 318-14 section 13.3, depth of footing over reinforcement should not remain under 150 mm.

8. The depth of the footing should be in such a manner that the shear strength of the concrete remains equivalent or surpasses the critical shear forces (one-way shear and punching shear) developed with factored loads.

9. In sloped, stepped, or tapered foundation, location and depth steps and angle of slope should satisfy design requirements at each section.

10. Concrete cover of 75 mm is necessary when the concrete is cast against soil.

11. With adherence to ACI Code specifications, base area of footing is set from unfactored forces and moments transferred by footing to soil and the permissible soil pressure evaluated through principles of soil mechanics. To get the necessary base area of the footing, the column service loads are divided with permissible net soil pressure of the soil. The net factored soil pressure is equivalent to factored load column loads by the selected footing area.

Read more
ACI 318-14 approved design guidelines of isolated footing

~~~~~~~~~~~~~~~~~~~~~~~~
Published By
Rajib Dey
www.constructioncost.co
~~~~~~~~~~~~~~~~~~~~~~~~

Tuesday, June 18, 2019

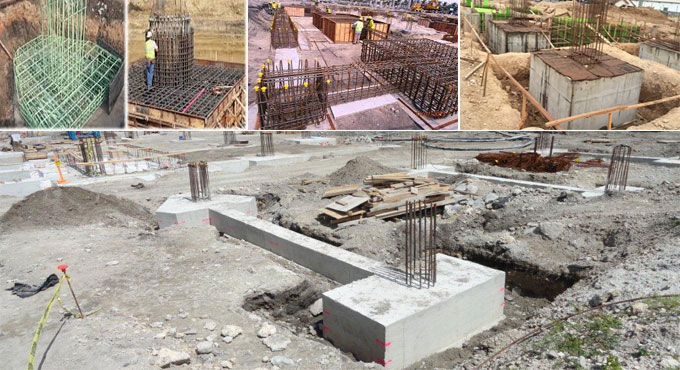
Some useful notes on Pile Cap Design

Definition of Pile Cap: A pile cap refers to a thick concrete mat that is situated on concrete or timber piles driven into soft or unsteady ground to develop a proper & secure foundation. It normally builds up section of the foundation of a building, mostly a multi-story building, structure or support base for heavy equipment.

It is frequently found that one pile can’t bear the entire load enforced on the column. Therefore, the column requires over one pile to bear the load. Here, a pile cap plays an important role to disperse the column load to these piles uniformly.

In this stage of design, precautions should be undertaken to disperse the load to the piles evenly by placing the center of gravity of the column to match up with the center of gravity of the pile cap.

To make sure that the load is transmitted from the column to the pile, the pile steel reinforcement should be expanded inside the pile cap with minimum 600 mm so that the load is transmitted with the bond among concrete and steel.

The pile caps are designed as a rigid foundation and ensure that the piles bear equivalent loads from the column in order that the pile cape thickness should be designed to withstand the punching stresses and the tension in top and bottom.

Shape and Size of Pile Caps:

1. The shape and plan dimensions of the pile cap are based on the number of piles in the group and the gapping among each pile.
2. These pile caps outlines & minimizes the plan area for uniform arrangement of piles about the load.
3. The pile cap should overlap exterior piles by minimum 150mm but should not be too much, usually not in excess of the diameter of the pile diameter.


It reduces the plan area as well as the cost, at the time of arranging adequate length to the followings:

1. Affix the tension reinforcement with a large radius bend
2. Provide sufficient cover to the reinforcement
3. Meet the tolerances of the construction


Depth of Pile Cap - The depth of pile cap is influenced by the following factors :

1. Shear strength of pile cap (beam and punching shear)
2. Shrinkage and swelling of clay


3. Frost attacks
4. Pile anchorage
5. Water table and soluble sulphates
6. Maintain bolt assemblies for steel columns


Shear is considered as most important factor for selection of depth of pile cap.

Normally a pile cap is much deeper as compared to a pad footing having similar dimensions, since it is prone to greater concentrated reactions, and accordingly to much greater bending moments and shear forces.

However, the increased depth assigns greater rigidity to the pile cap that results in spreading the load uniformly to all piles.

Some useful notes on Pile Cap Design

Read more
~~~~~~~~~~~~~~~~~~~~~~~~
Published By
Rajib Dey
www.constructioncost.co
~~~~~~~~~~~~~~~~~~~~~~~~

Monday, June 17, 2019

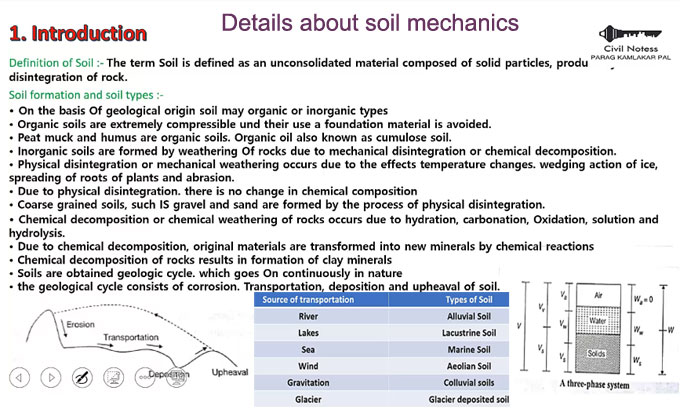
Details about soil mechanics

This civil engineering article is based on soil mechanics. The article focuses on soil development, source of transportation of soil, normally found soil designation, soil structure etc.

How soil is developed?

1. The soil is categorized as organic or inorganic depending on the geological source.
2. As organic soils very compressible, they should not be used as a foundation material.
3. Organic soils are also known as cumulose soil. Examples of organic soils are peat muck and humus.
4. To develop inorganic soils, the rocks are seasoned because of mechanical decay or chemical degradation.
5. Physical decomposition or mechanical weathering happens because of the impact of temperature variations.
6. Because of physical decomposition, chemical composition of soil remains unchanged.

7. Course grained soils like IS gravel and sand are built up with the method of physical decomposition.
8. Chemical disintegration or chemical weathering of rocks happens owing to hydration, carbonation, oxidation, solution and hydrolysis.
9. Because of chemical disintegration, original materials are changed to new materials through chemical reactions.
10. Chemical degradation of rocks leads to development of clay minerals.
11. Soils are made with geologic cycle that runs uninterruptedly in nature.

 
The geological cycle contains corrosion, transportation, deposition and upheaval of soil.

Normally applied soil designation:

Bentonite : Disintegrated volcanic ash in which high percentage of clay mineral (montmorillonite) are included.

Black Cotton Soil : It contains the mineral montmorillonite and discharge large swelling and shrinkage.

Loam : It is formed by mixing sand, silt and clay size particles approximately in same ratios.

Moorum : It belongs to gravel blended with red clay.

Varved clay : It belongs to clay and silt of glacial origin particularly a lacustrine deposited.

Go through the following video for online demonstration www.youtube.com

Details about soil mechanics

~~~~~~~~~~~~~~~~~~~~~~~~
Published By
Rajib Dey
www.constructioncost.co
~~~~~~~~~~~~~~~~~~~~~~~~
Friday, June 14, 2019

Impacts of earthquake on structures

Earthquake produces severe damages to the structures. For this purpose, thorough knowledge about the seismic effects on a structure is required. The designers and contractors should be capable of analyzing the effect of seismic forces on buildings to adopt protective measures against failures and collapses.

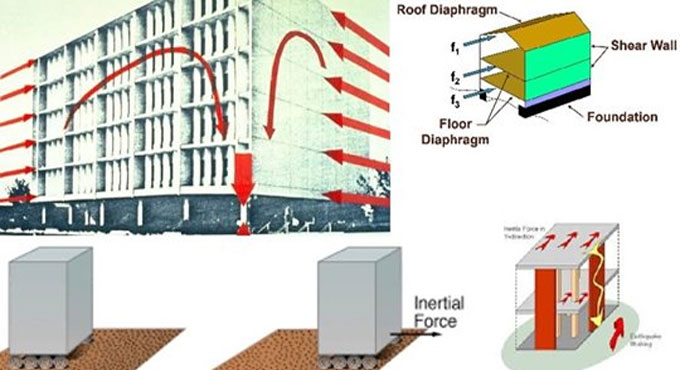
When earthquake strikes on structures, it develops damaging inertia forces which lead to deformations as well as horizontal and vertical shaking.

Given below, detail explanation about these effects :-

Impacts of Earthquake on Structures

1. Inertia Forces in Structures: The formation of inertia forces in a structure refers to one of the seismic influences that adversely damage the structure. When ground shaking occurs due to earthquake, the base of the building proceeds but the roof remains motionless. As the walls and columns are connected with it, the roof is pulled by the base of the building.

The susceptibility of the roof structure to stand at its original position is known as inertia. The inertia forces lead to shearing of the structure that can consolidate stresses on the fragile walls or joints in the structure causing failure or perhaps total collapse. Lastly, more mass signifies greater inertia force and due to this lighter buildings can resist the earthquake shaking efficiently.

2. Impact of Deformations in Structures: When a building undergoes earthquake along with ground shaking, the base of the building proceeds with the ground shaking. But, the roof movement varies from that of the base of the structure. This variation in the movement produces internal forces in columns and as a result the column goes back to its original position.

These internal forces are known as stiffness forces. The stiffness forces become greater when the sizes of columns are raised. The stiffness force in a column belongs to the column stiffness times the relative displacement among its ends.

3. Horizontal and Vertical Shaking: Earthquake contributes to shaking of the ground in all the three directions X, Y and Z, and the ground shakes indiscriminately from side to side along each of these axis directions. Normally, the purpose of designing the structures is to resist the vertical loads in order that the vertical shaking resulting from earthquakes (either adds or subtracts vertical loads) is controlled through safety factors provided in the design to sustain vertical loads.

However, horizontal shaking along X and Y directions is dangerous for the operation of the structure as it develops inertia forces and lateral displacement and consequently sufficient load transfer path should be arranged to resist its detrimental influences on the structure.

Exact inertia force transfer path is formed through adequate design of floor slab, walls or columns, and connections among these structural components. It should be noted that the walls and columns are vital structural components in transmitting the inertial forces. The masonry walls and thin reinforce concrete columns create weak points in the inertia force transfer path.

4. Other Effects: Due to earthquake various other effects may occur which range from liquefaction, tsunami, and landslides. These belong to the indirect effects of strong earthquakes that can lead to significant devastation.

Read more

Impacts of earthquake on structures

~~~~~~~~~~~~~~~~~~~~~~~~
Published By
Rajib Dey
www.constructioncost.co
~~~~~~~~~~~~~~~~~~~~~~~~
Thursday, June 13, 2019

How to work out the rolling margin for reinforced steel

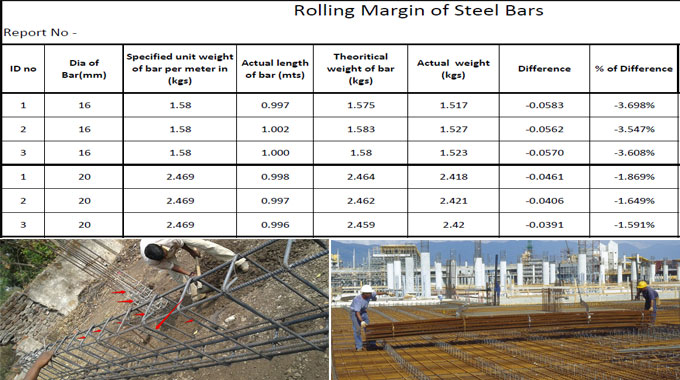
Rolling margin means the proportion of deviation in permissible sectional weight of reinforcement steel according to IS codes. Reinforcement steel is ejected from a mould that is formed with a specific size e.g. 8mm Dia. When the mould is completely new, the sectional weight of 8mm steel ejected via mould will remain lower than that .i.e. 0.395kg per Metre or lessor according to IS codes.

Mould will be expanded in due course of time or once specific quantity of production is extracted from a specific mould.

Now, similar 8mm dia bars are ejected from the equivalent mould and they will gain more weight per Metre, as for example 0.400Kg per Metre rather than 0.395 as per IS. It sinifies more mass per Metre/Length is necessary for same length.

This deviation in weight as per IS code-1786 for several dia is given below :-

8mm to 10mm +- 7%
12mm to 16mm +- 5%.
20mm and above +- 3%.


The measurement of rolling margin is done in the following ways :-

Total Weight of Bars (Dia wise) / Total Running Metre of Bars = Actual Sectional Weight of bars.

Compare sectional weight with Standard IS Weight.

Weight as per IS Standard = Dia x Dia / 162.
 
Rolling margin is the variation among the theoretical and actual weight of steel. It is caused by the die utilized for casting of rebars. As time goes, the shape of die is modified and consequently the diameter of the steel bar is also altered that leads to disparity in unit weight of steel.

The size of the die is retained small and accordingly rolling margin is negative in the preliminary phase of production, after that it is more of less near to theoretical weight and then the size of die is raised that causes to put rolling margin on positive side.

If the steel is brought from similar supplier over a period of time the rolling margin would be revised and no loss will be occurred.

How to work out the rolling margin for reinforced steel

Read more
~~~~~~~~~~~~~~~~~~~~~~~~
Published By
Rajib Dey
www.constructioncost.co
~~~~~~~~~~~~~~~~~~~~~~~~
Wednesday, June 12, 2019

Some vital instructions to make your boundary walls stronger

Substandard foundations, poor design, scarcity of expansion joints and piers (support pillars) generally lead to cracks in masonry boundary walls.

If a subsisting wall is inclined, unsteady or contains severe cracks, then proper remedies should be taken immediately.

Given below, some vital guidelines while setting up a new boundary wall:

1. The design of the wall: Besides, adhering to local by-laws concerning height restrictions and set-backs on street corners, proper engineering principles should also be applied to the design of any freestanding wall.

Both the thickness of the wall and the spacing of piers control the maximum height of the wall over ground level.

2. Foundations: While creating the design of the foundations, soil conditions and slopes should be considered. Steel reinforcement of the foundations and of the wall itself are vital components. A general rule of thumb is that the foundation should be broader and deeper so that the support of the wall becomes more stable.

3. Retaining walls: When the boundary wall functions as a retaining wall and is susceptible to water and soil thrust, then the foundation footing should be expanded more beneath the upper side of the wall to make sure that the weight of the chosen soil further firm ups the foundation structure.

4. Adequate expansion joints and piers: If expansion joints are not set up perfectly without adequate piers, the walls can be cracked easily.

If there are cavities in the piers of freestanding walls (along with hollow units), they should be filled with concrete instantly.

5. Drainage: If the boundary wall is located on a slope, then sufficient weep holes should be installed to dispose of accumulated storm water.

When the wall also functions as a retaining wall, there should proper arrangement of sub-soil drainage. NHBRC (Part 3. 3:24) indicates that weep holes should be set up in all retaining walls at a height not greater than 300mm over the lower ground level at centres not surpassing1.5 metres. Weep holes should be created with a 50mm plastic pipe covered on the non-exposed end with a geofabric.

6. Damp: Boundary walls are generally freestanding as these walls do not usually build section of a structure (like a house), where the connected walls are self-bracing. Since the freestanding walls are not supported by a structure of other walls, boundary walls are normally constructed exclusive of a damp proof course (DPC), plastic membrane so as to make the bond stronger among the freestanding wall and its foundation.

A DPC can rupture the bond among wall and foundation that leads to instability. Without DPC, mounting damp is frequently found on plastered and painted boundary walls. To get rid of this issue, the harder (less porous) bricks should be used for the lower courses (first 150mm) and make sure that the plaster does not expand to the level of the soil, else the plaster will function as a wick and allow water going from the ground to wick upwards.


Some vital instructions to make your boundary walls stronger

~~~~~~~~~~~~~~~~~~~~~~~~
Published By
Rajib Dey
www.constructioncost.co
~~~~~~~~~~~~~~~~~~~~~~~~
Tuesday, June 11, 2019

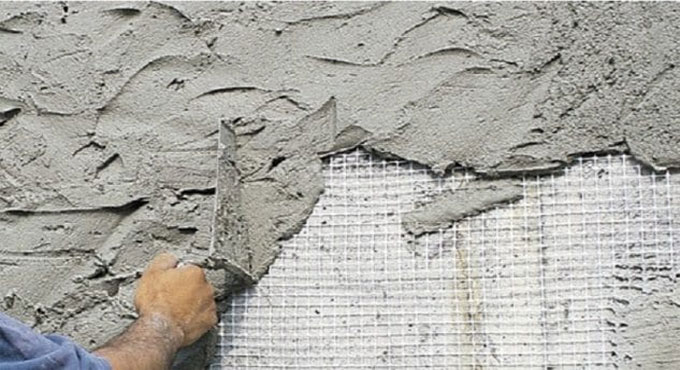
Common Defects In Plastering

Several types of defects are found in plastering work which range from blistering, cracks, efflorescence, flaking, peeling, popping, softness and uneven surfaces. When these defects are visible, they should be repaired instantly.
Types of Defects in Plastering :-
1. Blistering of Plastered Surface: Blistering of the plastered surface is happened when small patches are expanded outside the plane of the plastered surface. Blistering is visible for plastered surface inside the building.
2. Cracks in Plastering: Cracks are developed on the plastered surface. Two types of cracks are found i.e. hairline cracks and wider cracks. The hairline cracks can’t be seen easily whereas the wider cracks are observed easily. The formation of fine cracks is termed as crazing.
Cracks on a plastered surface occur because of thermal movements, discontinuation of surface, structural defects in the building, defective workmanship, too much shrinkage etc.
3. Efflorescence on Plastered Surface: Efflorescence is developed on plasters when soluble salts are found in plaster making materials and building materials like bricks, sand, cement etc. Even water applied in the construction work may include soluble salts.
When a wall (newly built up) dries out, the soluble salts are provided to the surface and they become visible in the form of a whitish crystalline substance. Such a growth is defined as efflorescence and the adhesion of paint with the wall surface is severely damaged with it.
Efflorescence provides a very ugly appearance and can be eliminated slightly through dry-bushing and washing the surface frequently.
4. Flaking: The development of a very small loose mass on the plastered surface is called flaking and it is mainly occurs because of bond failure among consecutive coats of plaster.
5. Peeling: In peeling, the plaster from some section of the surface are detached and a patch is developed. Peeling is primarily occurred because of bond failure among successive coats of plaster.
6. Popping: Sometimes the plaster mix comprises of particles which get bigger on being set. A conical hole in plastered surface is created in front of the particle. This conical hole is termed as blow or pop.
7. Irregular Plaster Surface: Irregular surface defect becomes apparent because of substandard workmanship of the plastering work.
8. Softness of the Plaster: The extreme dampness at specific points on the plastered surface transforms that section soft. The softness mainly happens owing to unnecessary thinness of the finishing coats, existence of deliquescent salts, extreme suction of the undercoats etc.
9. Rust Stains on Plastered Surface: Rust stains are sometimes visible on the plastered surface specifically when plaster is provided on metal lath.
Common Defects In Plastering
Read more
~~~~~~~~~~~~~~~~~~~~~~~~
Published By
Rajib Dey
www.constructioncost.co
~~~~~~~~~~~~~~~~~~~~~~~~