adsense analytic

Showing posts with label cost estimating. Show all posts

Friday, June 5, 2020

How to make Salt Finish Concrete Surface

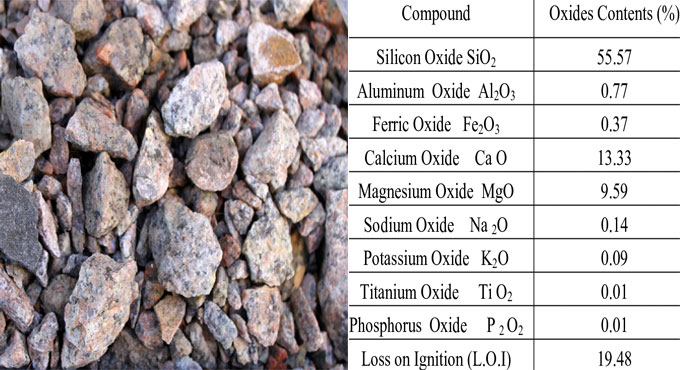
Salt Finish Concrete Surface is used in pavements, driveways and courtyards, creating a subtly rough texture to plain concrete. It effectively offers great skid resistance that lasts a very long time. It is also aesthetically more pleasant than simple or colored concrete, or broom finish concrete.

Coarse rock salt crystals are spread over the soft concrete and then inserted by using a roller on them. Afterwards, when the concrete is set, it is washed with clean water. This ensures good skid resistance and a nice subtle texture.

Let us now see the steps to make salt finish concrete surface.

Step 1. Prepare the subgrade

The subgrade has to be prepared properly if you want to have a good salt finish concrete surface. This helps you achieve uniform slab thickness, provide necessary support for the loads on the surface, and prevent cracks in the concrete.

Step 2. Place the framework and reinforcements

Provide a framework on both sides of the path to hold the concrete in one place. If the area is too large, you may want to use multiple frameworks. This should be at the same depth as the concrete. This will not only keep the soft concrete in place but also give it any 2D shape you desire.

How to make Salt Finish Concrete Surface

~~~~~~~~~~~~~~~~~~~~~~~~~~
Published By
Rajib Dey
www.constructioncost.co
~~~~~~~~~~~~~~~~~~~~~~~~~~

Wednesday, June 3, 2020

How to Create Templates in AutoCAD

Arguably the most famous and the most commonly used 3D modeling software ever, we all know about AutoCAD. It is a computer aided design and drafting solution brought to you by Autodesk. Today, we will learn how to create templates in AutoCAD.

As a design engineer, you often need to do the same type of design over and over again, don’t you? Every time you start one of these projects, you have to build the same things up from scratch. This can get frustrating. So, what do you do? Do you just copy-paste your previous design and make changes in that?

That’s a bad idea. It's prone to errors and you might end up doing more work than before.

What would be better is to keep a handy “basic” drawing available that is common to all of these drafts you have to make. Then keep using this “format” every time you start a new drawing of that kind. 

What would be better is to keep a handy “basic” drawing available that is common to all of these drafts you have to make. Then keep using this “format” every time you start a new drawing of that kind. 

This is, basically, what templates are all about. Templates are “basic format” drawings which are saved in separate locations and are used as the starting skeleton for particular kinds of drawing. 
Templates in AutoCAD are one of such features which help us to reduce our work and to save time. Before starting a new design project we have to change many settings in the drawing page like units, sizes, dimension styles, layers, etc. It is not easy and practical to do the settings every time you start a new drawing.

There are many online construction templates available. But also, you can create a custom template in AutoCAD. You can define your own parameters in this template. They are saved with DWT file extension. When you use it to start a drafting project, then you can save it in standard AutoCAD DWG format.
Let us see how we can create templates in AutoCAD in eight simple steps. 

How to Create Templates in AutoCAD

~~~~~~~~~~~~~~~~~~~~~~~~~~
Published By
Rajib Dey
www.constructioncost.co
~~~~~~~~~~~~~~~~~~~~~~~~~~

Tuesday, June 2, 2020

MMRC and Chennai Metro Rail Projects in India Restart After Partial Lifting of Lockdown

After the partial lifting of restrictions on important construction work, construction work has resumed in two major metro rail projects in India. One of them is in Pune, developed by the MMRC (Maharashtra Metro Rail Corporation). The other is in Chennai, by CMRL (Chennai Metro Rail Limited).

The MMRC project in Pune has been stalled for over a month, and they missed the target of covering the first five kilometers by the end of 2020. However, the MMRC started work in full vigour, with around 2000 labourers and support staff staying in camps around the site. Additionally, work on the part going over the river has also started.

The construction of the Pune Metro from PCMC to Swargate lines started in 2016 and was scheduled to finish by 2022. The work of 10 kilometers in line 1 (17 kms total) and line 2 (15 kms total) combined should have been finished in 2020. Those deadlines are going to be pushed back now.

Similarly, the metro rail construction work in Chennai has resumed after the green light from the government and civic body. This line is supposed to run from Chennai Central to Wimco Nagar, called the Phase-1 extension. The work here has been paused for nearly two months till now.

MMRC project in Pune

~~~~~~~~~~~~~~~~~~~~~~~~~~
Published By
Rajib Dey
www.constructioncost.co
~~~~~~~~~~~~~~~~~~~~~~~~~~

European Standards for Aggregates: Chemical

The aggregates utilized in the creation of concrete are inactive granular materials, for example, gravel, squashed stone, sand, slag, reused concrete, and geosynthetic aggregates. The aggregates might be normal, produced, or reused.
In this article, we examine the chemical necessity of the aggregates, for example, chloride, sulfur content, and other chemical constituents according to the European Standards (EN – 12620).
1. Chlorides Content: The water-dissolvable chloride particle content of aggregates for concrete will be resolved as per EN 1744-1:1998, proviso 7, and will, on demand, be announced by the maker.
In the event that the water-dissolvable chloride particle content of the joined aggregate is known to be 0.01 % or lower (e.g., for extrication from most inland quarries), this worth can be utilized in the figuring of the chloride content of concrete.
2. Sulfur Compounds
2.1 Acid Soluble Sulfate: The corrosive solvent sulfate content of the aggregates and filler aggregates for concrete decided as per EN 1744-1:1998, provision 12, will be proclaimed as per the pertinent classification determined in the books.
European Standards for Aggregates: Chemical
~~~~~~~~~~~~~~~~~~~~~~~~~~
Published By
Rajib Dey
www.constructioncost.co
~~~~~~~~~~~~~~~~~~~~~~~~~~

Friday, April 12, 2019

Definition of shear reinforcement and it’s type

Shear Reinforcement means reinforcement that is designed to withstand shear or diagonal tension stresses. Shear reinforcement is generally arranged in the form of stirrups to retain the longitudinal reinforcement as well as capture the shear to which the structure is exposed to.
TYPES OF SHEAR REINFORCEMENT - Described below, common types of shear reinforcement:
1. Vertical stirrups.
2. Bent up bars along with stirrups.
3. Inclined stirrups.
Vertical Stirrups: These belong to the steel bars arranged vertically around the tensile reinforcement at proper distance along the length of the beam. Their diameter differs from 6 mm to 16 mm.
The free ends of the stirrups are fastened in the compression zone of the beam to the anchor bars (hanger bar) or the compressive reinforcement. Based on the magnitude of the shear force to be defended the vertical stirrups may come as one legged, two legged, four legged and so on.
It is recommended to utilize narrowly spanned stirrups to get rid of the diagonal cracks in a better manner. The distance of stirrups adjacent to the supports is less relating to the distance close to the mid-span as shear force remains extreme at the supports.
Bent up Bars along with Vertical Stirrups: Some of the longitudinal bars in a beam are bent up adjacent to the supports where it is unnecessary to use them for withstanding bending moment as bending moment remains very less adjacent to the supports. These bent up bars defend against diagonal tension. Equal numbers of bars should be bent on both sides to maintain consistency. The bars are bent up at more than one point evenly along the length of the beam.
These bars are normally bent at 45º.
This system is very effective for higher shear forces. The total shear resistance of the beam is measured with the inclusion of the bent up bars and vertical stirrups.
The provision of bent up bars should not be in excess of half of the total shear reinforcement.
Inclined Stirrups: Normally, inclined stirrups are arranged at 45º for countering diagonal tension. They are arranged all through the length of the beam.
Definition of shear reinforcement and it’s type

~~~~~~~~~~~~~~~~~~~~~~~~~~
Published By
Rajib Dey
www.constructioncost.co
~~~~~~~~~~~~~~~~~~~~~~~~~~

Saturday, March 30, 2019

Basic variations among main bars and distribution bars

In this exclusive civil engineering article, you will know the difference between the main Bars and Distribution Bars in slab reinforcement.

Main bars and Distribution bars are vital terms which are found in slab reinforcements. In this civil engineering article, you will come to know the variations among main bar and distribution bar in slab as well as where these bars should be arranged in R.C.C slab.

MAIN BARS IN SLAB:

1.  The main reinforcement should be arranged at the shorter extent of the slab, as in the shorter extent slab has to undergo High bending Moment that is called sagging or positive bending moment.
2. nbsp; Main reinforcement bars have to resist and bear all the tensile stresses, bending moment (Sagging), and superimposed load (Dead load) which are formed at the shorter extent of the slabs.
3.  Main reinforcement bars are arranged in one way slab in one side (At shorter extent), but in two way slab, the bars are arranged in both ways.
4.  In Flat plate slabs the main bars are arranged in one direction at bottom of the distribution bar (in shorter extent).

5.  Main bars in the slabs should not be under 8 mm while applying (H.Y.S.D) or 10 mm for plain bars.
DISTRIBUTION BARS IN SLAB:
1.   Distribution reinforcement bar should be arranged at the longest side extent of the slab.
2.  Distribution bar are specifically created to allocate the super imposed load consistently or resist the Shrinkage stresses which are formed because of fluctuation of temperature in winter or summer.
3.   In Flat plate slab the, the distribution bars are arranged in one direction at top of main bar (in longest extent).
4.   The distribution bars should not be under 8 mm in a diameter or not in excess of 1/8 of the thickness of the R.C.C slabs.
5.   The distribution bars are arranged to retain the mesh in exact location and keep the center to center c/c, bars spacing among main bars.
VARIATION AMONG BETWEEN MAIN BARS AND DISTRIBUTION BARS:
1.  The Main bars are generally arranged at the bottom of distribution bar in slabs whereas distribution bars are arranged on the top of the main bar.
2.  The Main bars are arranged in the shorter extent of the slabs whereas distribution bars are arranged in the longer extent of the slabs.
3.  The main reinforcement is arranged to resist the bending moment, tensile stresses and superimposed load whereas distribution bars are utilized to allocate the load uniformly as well as withstand the shrinkage stress (Temperature discrepancy) or retain the mesh in exact location.
4.  Main bars in the slab should not be under 8 mm when (HYSD) or 10 mm bars are used. But, when, plain bars and the distribution bars are used, it should not be under 8 mm diameter and the bar should not be in excess of 1/8 of the thickness of the slab.
Basic variations among main bars and distribution bars

~~~~~~~~~~~~~~~~~~~~~~~~
Published By
Rajib Dey
www.constructioncost.co
~~~~~~~~~~~~~~~~~~~~~~~~

Tuesday, March 19, 2019

How to measure minimum bar spacing for Bundle Bars in Cast-in Place Concrete as per AASHTO provisions

Minimum Bar Spacing: As per AASHTO LRFD, section 5.10, the minimum bar spacing for bundled bars should be measured on the basis of the acquired diameter rather than computing from individual diameters.

As for instance, if there are 2 nos. 32 mm dia bars, the similar diameter in accordance with 2×32 is 45mm. Therefore, 45 should be employed to utilize the following clauses from AASHTO.

For 2×32 dia bars, clear spacing should be provided as ~68mm for Cast-in Place concrete and 60mm for precast concrete.

Refer following Clauses from AASHTO LRFD 5th Edition 2010


5.10.3.1.1—Cast-in-Place Concrete
For cast-in-place concrete, the clear distance among parallel bars in a layer should not be under :
5 times the minimal diameter of the bars,
5 times the maximum size of the coarse aggregate, or 1.5 in.
5.10.3.1.2—Precast Concrete
For precast concrete fabricated under plant control conditions, the clear distance among parallel bars in a layer should not be under :
The minimal diameter of the bars,
33 times the maximum size of the coarse aggregate, or 1.0 in.
5.10.3.1.5—Bundled Bars
The number of parallel reinforcing bars bundled in contact to function as a unit should not go beyond four in any one bundle, apart from flexural members, the number of bars greater than No. 11 should not go beyond two in any one bundle.
Bundled bars should be attached within stirrups or ties. Individual bars in a bundle, cut off inside the extent of a member, should be abandoned at several points with minimum a 40-bar diameter stagger. Where spacing limitations are dependent on bar size, a unit of bundled bars should be considered as a single bar of a diameter taken from the corresponding total area.
How to measure minimum bar spacing for Bundle Bars in Cast-in Place Concrete as per AASHTO provisions
~~~~~~~~~~~~~~~~~~~~~~~~~~
Published By
Rajib Dey
www.constructioncost.co
~~~~~~~~~~~~~~~~~~~~~~~~~~

Tuesday, October 9, 2018

Consequences of Wrong Structural Design

This construction article sheds light on the causes of improper structural design.

Defects in Construction

Improper size of the Columns

If the size of the columns is 9”x9” and the building is likely to be built up to G+2 floors that is really unfavorable for the structure. It may cause structural failure and in due course structural collapse.

9”x9” size columns are suitable when it is required to build up a ground floor structure with M15 grade concrete. If it is necessary to build up another floor (G+1), the least size of the column should not be under 9”x12” with M15 grade concrete.

If it is required to utilize smaller columns (9”x9”); M20 grade concrete must have been utilized and the construction should not be started unless the client gives approval.

Incorrect alignment of the columns

The columns are not arranged in a straight line. When a wall is going to be developed connecting the columns, it becomes complicated to have a straight wall. It is so inaccurate. It is confusing how the beams will rest on the columns.

Incorrect wall construction

The construction process of the outside wall is also imperfect. The walls are not merged at a particular corner. If there is not a column construction in a corner, two beams approach together and rest on each other to provide strong support to the structure.

Consequences of Wrong Structural Design

Read more

~~~~~~~~~~~~~~~~~~~~~~~~
Published By
Rajib Dey
www.constructioncost.co
~~~~~~~~~~~~~~~~~~~~~~~~

Thursday, August 9, 2018

How the strength of concrete is influenced by the temperature

The concrete strength performance in initial phase is significantly affected by the temperature control. In cold weather, the temperatures of concrete should be managed with powerblanket™ concrete curing blankets so that proper compression strengths are attained as soon as possible. Once, the concrete attains the perfect strength, the construction process is started.

The following four phases of works are required for building up RCC column :-
Column layout work
Column reinforcement work
Column formwork
Concrete Pouring into column


Given below, the detail segregation of strength gains after three days at different temperatures:
Temperature – Compressive Strength (psi)
70°F – 2,700
60°F – 2,150
50°F – 1,600
40°F – 1,200
30°F – 850
20°F – 400
In order to keep most favorable concrete strength, the following activities should be undertaken while placing concrete in cold weather:
Utilize a heated or warm concrete mix.
Keep an eye so that the concrete can’t be freezed – Apply powerblanket™ concrete curing blankets to manage temperature.
Ensure that the concrete should be arranged on a frozen sub-grade – Apply powerblanket™ concrete curing blankets to manage temperature.
Safeguard concrete against extreme drying.
Include accelerators to retain strength and normal set time.
Stay away from quick changes in concrete temperature with powerblanket™ concrete curing blankets.
How the strength of concrete is influenced by the temperature


~~~~~~~~~~~~~~~~~~~~~~~~
Published By
Rajib Dey
www.constructioncost.co
~~~~~~~~~~~~~~~~~~~~~~~~

Monday, August 6, 2018

Mechanical properties of building materials

All the building structures are developed with various types of materials. These materials are either known as building materials or materials of construction. The cost of material in a building varies from 30 to 50 percent of entire building cost.

Given below, the detail mechanical properties of materials :-

Strength:

a. Strength is defined as the strength of material to resist the load.
b. Strength of materials – Capacity to resist an applied stress devoid of failure.
c. Compressive strength – Capacity to resist axially directed pushing forces.
d. Tensile strength – Highest stress at the time of being expanded or dragged prior to necking.
e. Shear strength – The capacity to resist shearing.
f. Elasticity – In a material if exterior load is employed it experiences deformation and on elimination of the load, it gets back to it’s actual shape.


Plasticity: If a material fails to retrieve it’s actual shape while eliminating the exterior load, it is defined as plastic materials.

Ductility: When a material experiences a significant deformation devoid of rupture, it is known as ductile materials.

It experiences a large deformation throughout tensile test. It is considered as the most perfect material for tension member. Steel, copper, wrought iron, aluminum alloys belong to ductile materials.

Elongation is in excess of 15%

Brittleness:

a. If a material can’t experience any deformation if some external force functions on it and it collapses with rupture.
b. Brittleness means powerful in compression and poorer in tension.
c. Brittleness is found in C.I, glass, concrete, bricks etc.
d. Elongation remains under 5%


Malleability: Malleability is the capability of a material to distort under pressure (compressive stress). After being malleable, a material is flattened into thin sheets through hammering or rolling. Several metals with high malleability also contain high ductility.

Malleable materials are gold, silver, copper, aluminum, tin, lead steel etc.
Toughness: Toughness means the capability of a material to consume energy prior to rupture is known as toughness.
Toughness is found in mild steel, wrought iron etc.
Hardness: Hardness means the resistance of materials against abrasion, indentation, wear and scratches.
C.I is stronger material.
Stiffness: Stiffness refers to force that is necessary to create unit deformation in a material.
Creep: Creep means inelastic deformation because of sustained load.
Physical properties of materials
Bulk density = ρ = M/V
Water absorption
Permeability
Stability
Specific gravity (G): Mass of solids of specified volume / Mass of equal volume distilled water
Mechanical properties of building materials

~~~~~~~~~~~~~~~~~~~~~~~~
Published By
Rajib Dey
www.constructioncost.co
~~~~~~~~~~~~~~~~~~~~~~~~

Friday, August 3, 2018

Some useful information on detailing of beam

Detailing is one of the most crucial basic features of any construction. The architect should evaluate and place different elements of RCC members with proper care.

Proper detailing of reinforcements with accurate drawings is necessary at the construction site to maintain perfect construction process. Normally, these drawings comprises of a bar bending schedule. The bar bending schedule defines the length and number, location as well as the shape of the bar.

The detailing of beams is normally related to the followings :-

a. Size and number (or spacing) of bars
b. Lap and curtailment (or bending) of bars
c. Development length of bars
d. Clear cover to the reinforcement
e. Spacer and chair bars


The steel that is applied in beams pertains to various categories on the basis of the following objectives :-

i) Longitudinal reinforcement at tension and compression face (at least two 12 mm diameter bar should be arranged in tension) in single or multiple rows should be supplied.

ii) Shear reinforcements in the type of vertical stirrups and or bent up longitudinal bars should be arranged. (The bar bent round the tensile reinforcement and delivered to the compression zone of an RCC beams is known as stirrups).

iii) Side face reinforcement in the web of the beam is placed when the depth of the web in a beam remains in excess of 750 mm. (0.1% of the web area and allocated consistently on two faces at a distance not surpassing 300 mm or web thickness whichever is lower).

Some useful information on detailing of beam


Read more

~~~~~~~~~~~~~~~~~~~~~~~~
Published By
Rajib Dey
www.constructioncost.co
~~~~~~~~~~~~~~~~~~~~~~~~

Wednesday, August 1, 2018

Stress Control by Deflecting & Debonding Tendons in PSC Design

If precast beams contain straight, fully bonded tendons, they can be easily detailed and manufactured. The main benefit of pre-stressing is that it can apply the dead toad of the unit to minimize the transmission of the tensile stresses in the concrete.

But dead load is lost in such members since this tension remains most critical at the ends of the beams, where the alleviating effect owing to dead load is zero. The methods of deflecting and debonding tendons are frequently applied in pre-tensioned beams to obtain a pre-stress distribution much like that is obtained by the draped profiles of post-tensioned systems. It maintains some of the dead-load benefits, which lead to fewer tendons in the beams or a slightly smaller depth of beam than would be feasible with straight, fully bonded tendons.

Stress Control by Deflecting Tendons: The method of deflecting some of the tendons upwards towards the ends of a beam at a proper position along the span transfers the important section at transfer to this position, where vital relieving stresses as beam dead-load bending moment is accessible. Based on the stress computations for the end regions of the beam, the design engineer set the number of tendons to be deflected and the position of the deflection point.

The deflection point normally remains in the neighborhood of the quarter-span position, where three-quarters of the mid-span value of dead-load moment is accessible to neutralize the tensile stress (top fibre) because of pre-stress at transfer.

The angle of deflection of these tendons are placed in such a manner that the effective eccentricity and the pre-stressing force of the tendons do not generate a tensile stress of more than N/mm2 at transfer at the important sections, a limit set in the Code.

This method of deflecting tendons is specifically effective where continuity for live loads should be set in the finished structure since by deflecting some of the tendons upwards towards the ends of a beam, some compressive stresses are produced in the top fibre at the ends. This is useful for withstanding tensile stresses occurred because of the hogging moments caused by the passage of live loads on the superstructure. It also minimizes the formation of compressive stress in the bottom fibre because of prestress and live loads or any other loads at the ends of the beam.

Another benefit of deflected tendons is that the Code allows the vertical component of the tendon force to be applied in withstanding the imposed shear force on the beams in areas which stay flexurally uncracked at the ultimate limit state. This component is also suitable for the flexurally cracked regions and for examining the maximum shear stress condition in the member. Due to some limited test evidence, however, the Code does not allow relief against shear in these later conditions. Actually, the shear resistance of any section is decided in both flexurally cracked and uncracked modes and the lower value is selected. The shear links are then designed to bear the rest of the enforced shear force. Because only the tendons which are situated within the web width are deflected, the strand pattern for the whole unit should be cautiously chosen so that sufficient strands are available for deflecting upwards towards the ends to meet the stress conditions during the length of the beam.

To get more details, go through the following link engineeringcivil.org

Stress Control by Deflecting & Debonding Tendons in PSC Design

~~~~~~~~~~~~~~~~~~~~~~~~
Published By
Rajib Dey
www.constructioncost.co
~~~~~~~~~~~~~~~~~~~~~~~~

Thursday, July 19, 2018

Details of top down construction method

Under top down construction method, the basement concrete slabs function as lateral bracing toward the perimeter wall system. Ground level and first basement slabs are poured, with access holes left to facilitate excavation below. Since every succeeding sub-grade level is finished, the floors perform as lateral bracing toward the perimeter wall system.

Top-down method is mostly suitable for two types of urban structures, tall buildings containing deep basements and underground structures like car parks, underpasses and subway stations. In such a circumstance the basement floors are built up as the excavation steps forward.

The top/down method is utilized for deep excavation projects where tieback installation can’t be done and soil movements should be reduced. Top-down construction method saves the entire construction time. So, it is mainly implemented for some major projects where time is a key factor.

The sequence construction starts with retaining wall set up and then load-bearing elements to support the future super-structure. The basement columns (generally steel beams) are built up prior to starting of excavation and rest on the load bearing elements. These load bearing elements normally belong to concrete barrettes constructed under slurry (or caissons).

Construction method: Given below, the detail construction method for top down construction :-


• Built up the retaining wall.
• Build up piles. Arrange the steel columns or stanchions where the piles will be developed.
• Carry on the first phase of excavation.
• Cast the floor slab of first basement level
• Start to build up the superstructure
• Carry on the second phase of excavation; cast the floor slab of the second basement level.
• Reiterate the similar method unless the required depth is attained.
• Develop the foundation slab and ground beams, etc. Finish the basement work.
• Continue constructing the superstructure unless it is completed.
To learn the step-by-step process in detail, go through the following video presentation.
Video Sourcegeobuuk

~~~~~~~~~~~~~~~~~~~~~~~~
Published By
Rajib Dey
www.constructioncost.co
~~~~~~~~~~~~~~~~~~~~~~~~

Thursday, July 12, 2018

How soil cement is used in earthfill dams & embankments

Now-a-days soil cement as a facing material for earthfill dams is considered very cost-effective where proper riprap is unavailable near the site.

A fairly rigid foundation is suitable in order that deformation after disposition of soil-cement is not vital; however, no uncommon design features should be integrated into the embankment.

Normal embankment construction methods are followed, with perhaps proper precaution to make sure a minimum of embankment consolidation and foundation settlement once the construction is completed.

The soil-cement is normally arranged and compacted in stair-step horizontal layers. It provides greater construction efficiency and operational potency. With standard embankment slopes of 2:1 and 4:1, a horizontal layer with 8 feet width will set least protective thicknesses of about 2 and 3l/2 feet correspondingly, measured normal to the slope.

It starts at the lowest layer of soil-cement, each subsequent layer is stepped back a distance equivalent to the product of the compacted layer thickness in feet times the embankment slope.

As for instance, if the compacted thickness is 6 inches and the slope is 2:1, the step back is = 0.5(2) = 1 foot. The normal compacted layer thickness is 6 inches. Soil-cement layers of this dimension is positioned efficiently and compressed with standard highway equipment.

A plating system that develops a single soil-cement layer parallel to the slope is often applied in less critical areas for slope protection. If the soil-cement facing does not start at natural ground level, the lower part of the embankment should remain on a flatter slope than the part safeguarded by the soil-cement; or a beam is arranged at the lowest elevation of the facing. It is necessary that the soil-cement expand underneath the minimum water level and over the maximum water level.

The top of the facing should contain a freeboard allowance of minimum 1.2 times the projected maximum wave height, or 5 feet, whichever is higher. The edges of the finished soil-cement layers should not be cropped since the rounded starstep effect allows retard wave runup. Soil-cement is produced with different types of soils.

The main standard for finding out the soil type is gradation. Coarse sandy or gravelly soils having about 10 to 25 percent material passing the No.200 sieve are perfect (American Society for Testing and Materials Standard Sieve Series). These soils are sufficiently stabilized with from 3 to 5 sacks of cement per cubic yard of compacted soil cement.

Standard compaction and placement control for soil-cement is recommended. If the amount of material smaller than the No.200 sieve surpasses 35 percent, some effort to determine a coarse material is appropriate from a processing cost standpoint. Soils with 50 percent or more material passing the No.200 sieve are not suggested for being applied in their natural state.

To get more details, go through the following link aboutcivil.org

How soil cement is used in earthfill dams & embankments

~~~~~~~~~~~~~~~~~~~~~~~~
Published By
Rajib Dey
www.constructioncost.co
~~~~~~~~~~~~~~~~~~~~~~~~

Wednesday, April 25, 2018

Steps to work out road filling in hilly area

S.L. Khan, the eminent civil engineer, presents another informative construction video tutorial where he briefly explains the process for working out the road filling in hilly area.

In this video, solution is given to the following examples :-


Examaple 1


With specified cross section of road in hill area, work out the quantity of earth work in banking toward the length of 100 ft.


Suppose the permission rate of the road is taken as breadth of the road and it is 32 feet. The half of it is 16 feet. The mean depth of the filling is taken as 1.85 feet. The side slope is taken as 2:1. The cross slope is taken as 10:1.


Based on the above data, the quantity of earth work in banking will be determined.


To obtain the total filling of this section, apply the following formula :-


Filling = Cross Section Area x Length


To learn rest calculation process, go through the following video tutorial.


~~~~~~~~~~~~~~~~~~~~~~~~
Published By
Rajib Dey
www.constructioncost.co
~~~~~~~~~~~~~~~~~~~~~~~~

Saturday, January 20, 2018

Brief information on Project Cost System

If the design is modified at the design stage of a construction project, the project costs are constantly estimated and evaluated to keep the project costs within the budget of the owners. This working budget is normally known as the engineers or architects estimate. As soon as the design is completed, the field cost-control system is prepared with a final, detailed cost estimate of the total work.

This type of cost estimate is generally created by the construction contractor or another party who will be directly associated with the field operations. The contractor estimate is then abridged to a working construction budget and develop the foundation of the construction cost control system.

While the construction process is going on, cost accounting methods are utilized to recover actual construction expenses from current construction operations. This information is then applied for the purpose of controlling the cost on the current project and for working out the cost of future projects. Besides, the cost system offers significant information related to project financial control.

Preliminary Cost Estimates: Preliminary estimates of future construction expenses, are prepared throughout the project planning and design stages on the basis of approximation because these are accumulated prior to define the project entirely. This type of conceptual estimates differs from ascertaining the final detailed estimate of construction costs.

Basically, all conceptual price estimates are prepared on the basis of some system of gross unit costs which are acquired from earlier construction work. These unit costs are guessed forward in due course to focus on present market conditions, project location as well as the specific character of the job currently being considered. The following methods are followed to make preliminary estimates.


Cost per Function Estimate: This analysis is produced on the basis of the estimated expense per unit of use, like cost per patient, student, seat, or car space.
Construction expense may also be guessed like the average outlay per unit of a plants manufacturing or production capacity. These factors are normally applied as a method of instantly characterizing facilities costs at the setting up of a project when there is only raw marketing information, like the number of patients retained by a planned hospital. This extensive method of producing costs can also provide a powerful control on more detailed estimates as soon as they are created.
Index Number Estimate: This method is applicable for working out the price of a projected structure by upgrading the construction cost of the same type of current facility. It is performed by multiplying the original construction cost of the current structure with a national price index that is modified as per local conditions, like weather, labor expense, materials costs, transportation, and site location. A price index refers to the ratio of current construction cost to the original construction outlay for the type of structure concerned. Various types of price indexes are available in different trade publications.
Unit Area Cost Estimate: Under this type of method an approximate cost is selected with an estimated price for each unit of gross floor area. The method is found extensively in building and residential home construction. It offers a perfect rough calculation of costs for structures which are standardized or contain a large sampling of historical cost information from equivalent structures. This type of estimate is frequently applied in the industry to tally the relative value of different facilities.
To gather more information, go through the following construction article onlinecivilforum.com
Brief information on Project Cost System

~~~~~~~~~~~~~~~~~~~~~~~~
Published By
Rajib Dey
www.constructioncost.co
~~~~~~~~~~~~~~~~~~~~~~~~

Thursday, May 7, 2015

JUSTIN VANDERBRINK SAYS HOW BEST ESTIMATE CAN BE DONE FOR CLIENTS

The acute estimate of cost or rendering the perfect service is desired to any customer. Whatever would your business, you may run construction companies or a hospital administration, no customer likes financial surprises.

The client may be setting up brand new eatery, restructuring age-old house, the role of a cost estimator is to provide him best possible cost data. Justin Vanderbrink, vice president of Rives E. Worrell Company shared his write up tobusinessinsavannah.com . We are going to present you an excerpt.

The work of cost estimating needs such a level of honesty and integrity. This should be the Unique Selling Proposition (USP) of estimating service.

The 4D construction and planning

Sometime what it call a ‘napkin sketch’ which we term as the rough outline of the project in the premature stage. This sketch includes :

1. Square footage,
2. Number of floors
3. Building Height
4. Materials
5. Finishes
6. System

It is experienced that many construction estimating firms are doing it haphazardly, just copying and pasting it elsewhere in accordance with the basic knowledge or any previous calculation.

There are many estimating process which is based on speculations and ifs and buts. This extra-ordinary process gives a clear-cut process that gives estimate to the clients.

Now there is no more any guess work. This new process is certainly not depending on assumption. This is basically in-house developed Art to Science Estimating (ASE) system with the historical cost per square foot. The ASE system provides a complete line-item theoretical and conceptual estimate by drawing upon the cost history developed from several billion dollars worth of projects completed.

The system can take access data from the completed projects as per those were groupified. It can be healthcare, educational, office, courthouse, correctional or research and it can break down unit pricing specific to sub-group. Every cost is updated quarterly, taking into account variations based on local market conditions.

Additionally, the cost index of ASE always helps to refine the price and it gives an exact estimation by taking in account of 14 different material and labor component. Here the client can feel the difference. Most of the firms calculate the estimate only using six elements.

It is our principle that the estimators should not waist time and should not make clients wait. The firms such as Rives E. Worrell Co., a JE Dunn Construction Company looks after these responsibilities at the highest consideration. It is necessary to meet the client for discussing various options and settle on the costs.

It has to be remembered that the client is king. The companies should provide best support to the client’s help.

What are the aspects that clients generally get benefit from:- 

1. Accuracy of estimation
2. Transparency 
3. Well developed risk management (Mainly during early stages of the project when many variables are not yet clear)
4. Time savings
5. Additional Clarification
6. Flexibility throughout the project period.

If these things can be sorted out in time, then only the client can work with self-confidence and place him/herself in a decision making position during the design process. The estimation can be done with great accuracy.

Success and accomplishment is guaranteed in any trade with precise and exact cost estimation. Good cost estimation is not a magic. It cannot be done instantly. An old-hand estimator like Justin Vanderbrink describes the best process here.

It just needs to have a little amount of meticulousness, concentration to detail, knowledge with similar projects and a readiness to invest the time and resources to assist clients clear all their doubts long before the project starts.

~~~~~~~~~~~~~~~~~~~~~~~~~~~~~~~~~~~
Published By
Rajib Dey
~~~~~~~~~~~~~~~~~~~~~~~~~~~~~~~~~~~