adsense analytic

Showing posts with label Building Construction Design. Show all posts

Wednesday, January 31, 2018

The fundamentals of setting up Post-Tensioning Slabs

Construction of post-tensioned slabs on grade is equivalent to apply reinforcing steel, devoid of the tensioning step.

Cables are set up as per instructions of the engineer and placed to go over the center of the slab. For residential construction, tendons at 48 inches on center are generally accepted. Commercial foundations will contain much more steel. Tendons are routed around obstructions smoothly.

Generally, a residential post-tensioned concrete slab should have been 8 inches thick with 3000 psi concrete. As soon as the concrete achieves strength to 2000 psi, normally within the 3 to 10 days as suggested by PTI, the tendons are stressed.

Now-a-days, tendons are seven high-strength steel wires wound together and arranged inside a plastic duct. A PT anchor is situated at each end and these are found in pockets which are implanted into the slab edge. As soon as the strands are stressed, the wires are expanded —about 4 inches for a 50 foot strand—to employ 33,000 pounds of load.

The qualified workers should be appointed for doing stressing. Once the stressing is completed, the tendon is cut off and the pocket in which the anchors are situated is filled with grout to defend then against corrosion.

Bigger structural concrete members may also be post-tensioned, particularly in bridges and floors and beams in parking structures. The process is equivalent to that applied for slabs, with the exception of a bigger scale. The tendons will frequently be "draped" in order that they are low at the midpoint of a beam and high at the supports—this arranges the steel at the point of highest tension where it can retain the concrete to be remained together firmly.

With structural members the duct is frequently grouted full following stressing to tie the strand to the concrete along its entire length—these are known as bonded tendons. Unbonded tendons are mostly found in residential slabs and stay free to progress within the duct and are safeguarded from corrosion with grease.

The position of PT tendon and stressing is normally performed with companies with certified workers having expertise in this type of work.

For more information, read the following construction article concretenetwork.com

The fundamentals of setting up Post-Tensioning Slabs

~~~~~~~~~~~~~~~~~~~~~~~~
Published By
Rajib Dey
www.constructioncost.co
~~~~~~~~~~~~~~~~~~~~~~~~

Saturday, January 20, 2018

Brief information on Project Cost System

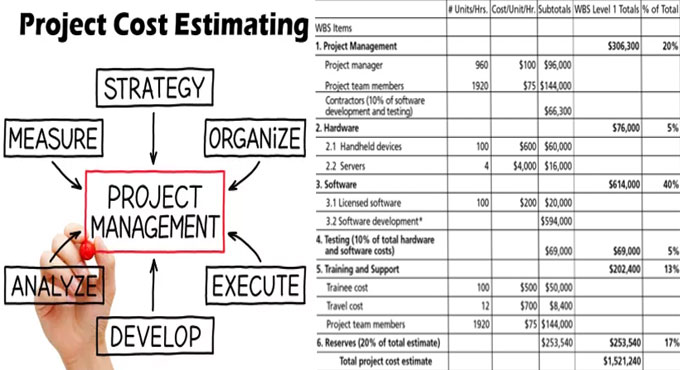
If the design is modified at the design stage of a construction project, the project costs are constantly estimated and evaluated to keep the project costs within the budget of the owners. This working budget is normally known as the engineers or architects estimate. As soon as the design is completed, the field cost-control system is prepared with a final, detailed cost estimate of the total work.

This type of cost estimate is generally created by the construction contractor or another party who will be directly associated with the field operations. The contractor estimate is then abridged to a working construction budget and develop the foundation of the construction cost control system.

While the construction process is going on, cost accounting methods are utilized to recover actual construction expenses from current construction operations. This information is then applied for the purpose of controlling the cost on the current project and for working out the cost of future projects. Besides, the cost system offers significant information related to project financial control.

Preliminary Cost Estimates: Preliminary estimates of future construction expenses, are prepared throughout the project planning and design stages on the basis of approximation because these are accumulated prior to define the project entirely. This type of conceptual estimates differs from ascertaining the final detailed estimate of construction costs.

Basically, all conceptual price estimates are prepared on the basis of some system of gross unit costs which are acquired from earlier construction work. These unit costs are guessed forward in due course to focus on present market conditions, project location as well as the specific character of the job currently being considered. The following methods are followed to make preliminary estimates.


Cost per Function Estimate: This analysis is produced on the basis of the estimated expense per unit of use, like cost per patient, student, seat, or car space.
Construction expense may also be guessed like the average outlay per unit of a plants manufacturing or production capacity. These factors are normally applied as a method of instantly characterizing facilities costs at the setting up of a project when there is only raw marketing information, like the number of patients retained by a planned hospital. This extensive method of producing costs can also provide a powerful control on more detailed estimates as soon as they are created.
Index Number Estimate: This method is applicable for working out the price of a projected structure by upgrading the construction cost of the same type of current facility. It is performed by multiplying the original construction cost of the current structure with a national price index that is modified as per local conditions, like weather, labor expense, materials costs, transportation, and site location. A price index refers to the ratio of current construction cost to the original construction outlay for the type of structure concerned. Various types of price indexes are available in different trade publications.
Unit Area Cost Estimate: Under this type of method an approximate cost is selected with an estimated price for each unit of gross floor area. The method is found extensively in building and residential home construction. It offers a perfect rough calculation of costs for structures which are standardized or contain a large sampling of historical cost information from equivalent structures. This type of estimate is frequently applied in the industry to tally the relative value of different facilities.
To gather more information, go through the following construction article onlinecivilforum.com
Brief information on Project Cost System

~~~~~~~~~~~~~~~~~~~~~~~~
Published By
Rajib Dey
www.constructioncost.co
~~~~~~~~~~~~~~~~~~~~~~~~
Friday, January 12, 2018

Simplify the rectangular & continuous footing design with StruCalc

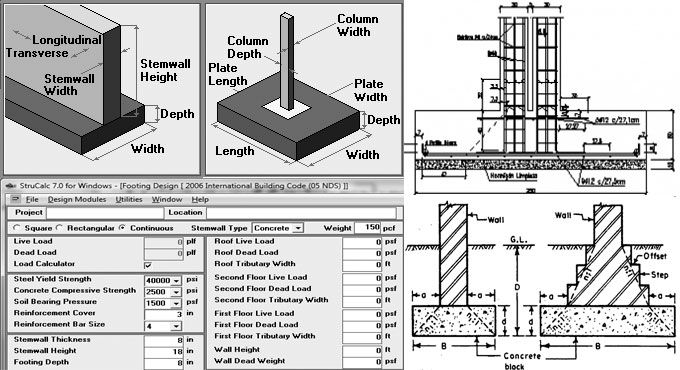
StruCalc’s footing design module is very useful to create the design of square, rectangular and/or continuous footings.

The footing module can be used to meet size and reinforcement requirements for any concrete footing loaded with pure vertical load. Once a footing type is set, StruCalc will then require what is providing the load; it signifies that the type of column is set for the square or rectangular footing, or the stemwall type for the continuous footing.

As soon as the footing type is provided, then the loads on the footing should be entered. The loads originate from two sources: calculations somewhere in the structure that might leads to reactions from beams, columns, walls, etc., or they might originate from the use of the load calculator. The load calculator will produce loads on the footing depending on the user set floor, roof, and wall loads accompanied by indicating tributary widths or areas.

Just fill in the load options of the calculator and it will automatically workout the Live Load and Dead Load.

As soon as the loads are provided, there exist some supplementary footing/environment information like steel yield strength, concrete compressive strength, soil bearing pressure, reinforcement cover, and reinforcement bar size etc. should have been entered.

StruCalc preloads some common values for the properties stated above, but the user will be able to modify any values that seem to be inappropriate.

Besides, adequate information concerning the column should also be entered while going to perform a square or rectangular footing design.

Now, for creating the designing of a square or rectangular footing, StruCalc will need a depth and a trial footing width (and length for rectangular footing) to be entered. Once, these are entered, StruCalc will check their capability provide the necessary reinforcement.

If the dimensions of the footing are not sufficient, a red bar will be visible in the lower right hand corner of the screen and new dimensions should have to enter. It will be at this point though, that StruCalc will have computed a necessary area for the footing. It will facilitate the user to indicate dimensions to fulfill the required area.

While going to design a continuous footing, then the density of the stemwall and height, along with the footing depth should have been entered. Once they are entered, StruCalc will produce a necessary footing width and the continuous reinforcement that is essential.

For more information, go through the following article www.strucalc.com

Simplify the rectangular & continuous footing design with StruCalc

~~~~~~~~~~~~~~~~~~~~~~~~~
Published By
Rajib Dey
www.constructioncost.co
~~~~~~~~~~~~~~~~~~~~~~~~~