adsense analytic

Saturday, November 17, 2018

Get some easy to follow tips for executing brick masonry from Floor to roof

Brick masonry work is one of the most vital part of building construction. In this informative construction article, you will learn how to accomplish the complete brick masonry work from Earth beam to roof.
The following four major steps are involved in brick masonry work :-
1. up to basement
2. up to sill level
3. up to lintel level
4. up to roof level.
Brick masonry up to Basement:
Prior to erect brick masonry, the most crucial task is to finish all adjoining column up to basement.
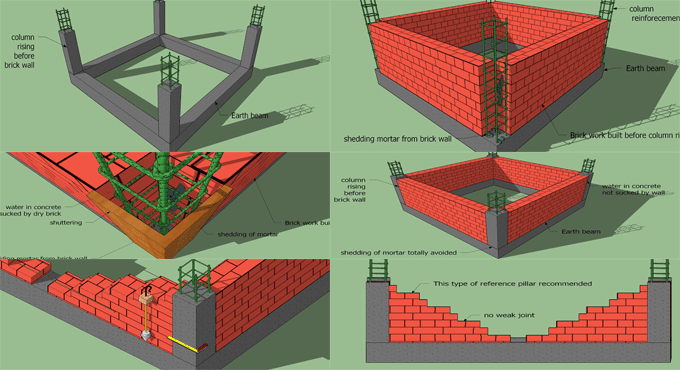
It is recommended to execute the column rising work prior to brick masonry otherwise the following problems may occur :-
While erecting brick wall, shedding of mortar should be provided in to the column bottom to make it rigid and not smoothly detachable.
In next day, as soon as the shuttering work is completed, some saw dust from different shuttering materials like plywood, timber also shedding in to the column bottom. They can’t be detached easily after shuttering.
When the column concrete is arranged after the completion of the brick masonry, the water in the concrete is absorbed with dry brick wall and a dry concrete is placed there devoid of adequate water cement ratio and it leads to a weak structure.
Therefore, the exact method is to initially execute the column work and after that accomplish the brick wall.
Initially, cleanse the entire earth beam with water and ready surface. Employ semi solid cement slurry on it. Spatter the brick with water. Chip the column sides by chisel and make the column surface rough so that a perfect binding is formed with brick joint.
Initially, erect the brick masonry as a reference pillar similar to a benchmark in all corners by applying the plump, set square and verify each opposite brick wall corner with level for each 3 courses. Alter the thickness of the mortar to retain the proper level. Abide by the remaining unless it attains the basement.
There will be 2 options just like above. Any one method can be applied at corners and in cross wall extension.
In the 1st method, there should be no weak straight joints. Mortar can be easily provided.
In the 2nd method, there should be weak straight joint. Mortar can't be easily provided for progressing further.
Once the corner reference wall is finished, each course can be formed one by one by attaching a strong thread among the two benchmark and thus the whole basement will be finished easily.
To get more detail information, go through the following link youtoobuild.blogspot.com
Get some easy to follow tips for executing brick masonry from Floor to roof
~~~~~~~~~~~~~~~~~~~~~~~~
Published By
Rajib Dey
www.constructioncost.co
~~~~~~~~~~~~~~~~~~~~~~~~

Friday, November 16, 2018

How to calculate mason, labor for brick masonry construction with help of thumb rule

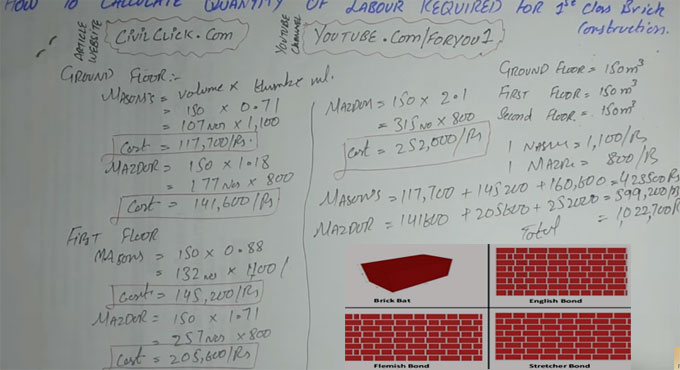
In this construction video tutorial, you will learn how to compute the mason as well as labor toward a 1st class brick masonry construction with the help of thumb rule.

A thumb rule refers to a principle having extensive application that is not projected to be exactly perfect or authentic for each situation. This method can be easily applied for making approx calculation or recollecting some value, or for making some determination.

It should be noted that the quantity of required labor will be gradually increased from ground floor to first floor to second floor etc.

Thumb rule is a constant value that is taken from the earlier construction work i.e. how much volume is covered by the labors employed in earlier projects. All the volumes are summed up to find out the average volume.

In ground floor, first floor and second floor, the volume of total area is taken as 150 m3

Ground floor :-

Mason = Volume x thumb rule (for mason) = 150 x 0.71 = 107 numbers
Now, suppose the charge for one mason = 1100 rupees
So, the cost for mason will be 107 x 1100 = 117, 700 rupees


Labor = 150 x 1.18 (thumb rule for labor) = 177 numbers
Suppose, one labor charge 800 rupees
Therefore, cost of labor = 177 x 800 = 141,600 rupees


Similar process should be followed for 1st floor and 2nd floor. Here, the value of thumb rule will be increased as the steps are increase.

To learn the calculation for 1st and 2nd floor, watch the following construction video tutorial.

How to calculate mason, labor for brick masonry construction with help of thumb rule

Read more
~~~~~~~~~~~~~~~~~~~~~~~~
Published By
Rajib Dey
www.constructioncost.co
~~~~~~~~~~~~~~~~~~~~~~~~

Thursday, November 15, 2018

Some useful guidelines for constructing parapet wall

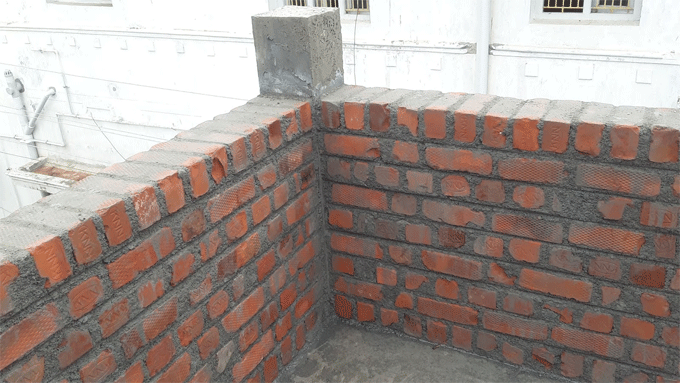
Parapet wall stands for a protection wall that can resist the collapsing from terrace to ground. Different types of parapet walls are found which range from brick wall masonry parapet wall, wooden handrail, iron grill etc.

Size of parapet wall:

1. Thickness of parapet wall should be minimum 9''. (full brick parapet wall)
2. Half brick parapet wall is not recommended for use.
3. Height of the parapet should be minimum 3'0''.


Once the centering and shuttering from roof slab bottom is detached, some deflection may happen at mid span of roof slab (positive bending moment). Similar thing will happen at support like negative bending moment.

With a view to prevent negative bending moment at support, huge amount of loads are required as downwards. In case of constructing the parapet wall as half brick wall, the roof can’t be prevented from uplifting. If the parapet wall is constructed as minimum 9'' thickness and minimum 3'0'' height, the roof slab can be prevented from uplifting. Therefore, different types of cracks at bottom of ceiling will be captured. To get rid of uplifting of roof, the centering & shuttering should be eliminated once the entire full brick parapet wall is constructed.

If the first floor is extended in future, the existing parapet wall should not be dismantled in case the wall is constructed as 9'' thick.

Assume, the parapet wall is constructed as half brick wall, now it is required to demolish the current parapet wall up to roof and make it as 9'', therefore, extra money will be incurred up to sill level of first floor.

While erecting half brick parapet wall, brick pillars should be arranged at regular interval ( 5 to 6 feet). Inner surface of parapet wall does not include flat surface since lots of offset will be created. Therefore, some problems will arise in waterline and sanitary plumping works.

Water from pump and discharge from water tank will be influenced with various offset produced with half brick parapet wall.

No tie exists for half brick parapet wall. As a result, wind pressure may provide some effects. Sliding of parapet wall may also happen.

If the column height is terminated for the height of the parapet wall (3 feet), it is required to dismantle for overlapping in future first floor construction. Adjacent Brick parapet wall will also be affected. If the height of parapet wall remains 3 feet, the column height should be increased for extra height for future overlapping. Then the column and parapet wall will be protected from over damaged.

Conclusion:
It is recommended to construct full brick parapet wall for minimum height of 3 feet devoid of half brick parapet wall.
There should be some provision for column for future overlapping.


Some useful guidelines for constructing parapet wall

Read more
~~~~~~~~~~~~~~~~~~~~~~~~
Published By
Rajib Dey
www.constructioncost.co
~~~~~~~~~~~~~~~~~~~~~~~~

Wednesday, November 14, 2018

Common types of cracks in reinforced concrete column

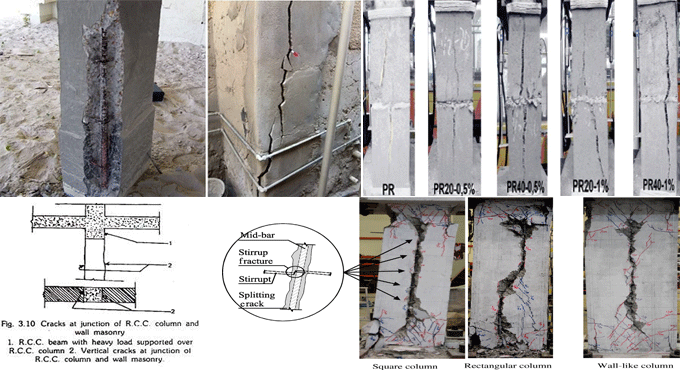
Usually, Four types of cracks are found in reinforced concrete column which range from diagonal cracks, horizontal cracks, splitting cracks, corrosion cracks. The cracks happen in columns due to improper design, defective construction or overloading, erosion of reinforcement, isolated settlement of foundations, creep and shrinkage.

Cracking in reinforced concrete column may result in loosing of strength, consistency, longevity, and adversely impact aesthetics.

Types of cracks found in concrete columns:

1. Diagonal Cracks: If there are diagonal cracks in reinforced concrete columns, they encircle the whole face of column anywhere along its height. Because of insufficient load bearing strength of the columns, inadequate cross-section and inadequate reinforcement steel.

Diagonal Cracks significantly impact the structural soundness and therefore it should be monitored carefully.

2. Horizontal Cracks: Horizontal crack in reinforced concrete column is generally found at the beam-column joint, and on column face where tensile stress is massive. Columns with insufficient moment resistance strength, inadequate reinforcements, or disposition of installed reinforcement may lead to horizontal cracking owning to the effect of shear force and direct load and uniaxial bending.

Finally, horizontal cracks significantly decrease the shear strength of the column and as a result there is high risk of failure. So, it should be dealt with instantly and carefully.

3. Splitting Cracks: Splitting cracks in reinforced concrete column belong to short parallel vertical cracks having non-uniform width. These types of cracks may occur in columns with insufficient steel reinforcement, and low concrete quality. Splitting cracks in concrete columns originated because of attaining its maximum load bearing strength.

The ultimate Load bearing strength of the column is exceeded when concrete cross section is not enough or reinforcement ratio is inadequate or combination thereof.

4. Corrosion Cracks: Corrosion cracks in concrete columns are formed along the line of reinforcements. These types of cracks are usually homogeneous in width and expand as the column is ageing.

Probable reinforcement erosion and insufficient bond among the concrete and steel bars lead to erosion reinforcement in concrete columns. If these types of cracks are not dealt with properly, the erosion of reinforcement will be increased at a rapid rate.

Common types of cracks in reinforced concrete column

Read more
~~~~~~~~~~~~~~~~~~~~~~~~
Published By
Rajib Dey
www.constructioncost.co
~~~~~~~~~~~~~~~~~~~~~~~~

Tuesday, November 13, 2018

Some useful tips for footing excavation measurements

In this informative construction video tutorial, you will learn how to make calculation for earthwork excavation on the basis of elementary thumb rules. Besides, you will also learn how to make cross examination at the time of estimation.

This video is very useful for building engineer or civil site engineer.

Normally, earthwork is necessary for all the civil engineering projects roads, railways, earth dams, canal bunds, buildings etc.

This earthwork may range from either excavation or earth filling or sometimes both will reach out to as per the required shape and level.

Fundamentally, the volume of earthwork is measured from length, breadth and depth of excavation or filling.

The following items are included in earthwork :- Excavation, Backfilling, Disposal of surplus earth

Here, the calculation is done on the basis of IS Code 1200 for BOQ.

The calculation of earthwork billing is done in the following ways :-

1) Mode of measurement of billing – Types of measurement used for billing of excavation. It is done with the formula like Length x Breadth x Height/Depth

2) Different types of billing – a) R.A. Bill (Running Account Bill)
b) Find Bill


To get more details about the calculation of earthwork excavation, go through the following video tutorial.

Video Source: CE&T-Civil Engg & Technology

~~~~~~~~~~~~~~~~~~~~~~~~
Published By
Rajib Dey
www.constructioncost.co
~~~~~~~~~~~~~~~~~~~~~~~~

Monday, November 12, 2018

Benefits of post-tensioning concrete slabs in building

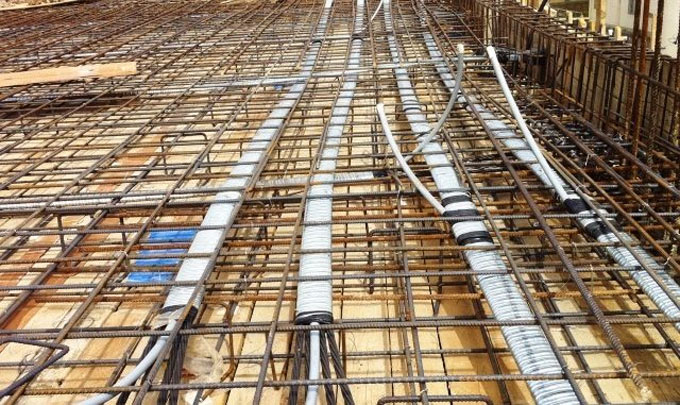
Post-tensioned concrete slabs in buildings provide various benefits over reinforced concrete slabs & other structural systems toward both single and multi-level structures. Described below, some of the advantages of the slabs :-

Longer Spans: Longer spans are utilized to lessen the number of columns. It leads to bigger, column free floor areas which significantly enhance the adaptability of application for the structure as well as leads to greater rental returns.

Entire structural cost: The complete cost of materials, labor and formwork which are essential to build up a floor is decreased for spans higher than 7 meters and consequently leads to huge cost savings.

Minimized floor to floor height: Thinner slabs are utilized for the similar imposed loads. The decreased section depths facilitate least building height together with consequent savings in facade costs. As a substitute, toward bigger buildings, it facilitates more floors to be developed inside the original building envelope.

Deflection Free Slabs: Unwanted deflections under service loads are virtually removed.

Water-resistant slabs: Post-tensioned slabs are designed to remain free from cracks and as a result water-resistant slabs should be formed with proper design, detailing and construction. The selection of concrete mix and curing method together with standard workmanship are also very important.

Early formwork stripping: The earlier stripping of formwork and curtailed backpropping requirements facilitate rapid construction cycles as well as fast reprocessing of formwork.

Materials Handling: The decreased material quantities in concrete and reinforcement significantly offer benefit to on-site carnage requirements. The stability of post-tensioning strand is roughly 4 times that of traditional reinforcement. So, the whole weight of reinforcing material is considerably minimized.

Column and footing design: The decreased floor dead loads are applied to create cost-effective design of the reinforcement concrete columns and footings. In multi-storied buildings, decreased column sizes may raise the floor net rentable area.

Benefits of post-tensioning concrete slabs in building

Read more

~~~~~~~~~~~~~~~~~~~~~~~~
Published By
Rajib Dey
www.constructioncost.co
~~~~~~~~~~~~~~~~~~~~~~~~
Tuesday, November 6, 2018

Some vital points to be remembered before purchasing ready mix concrete

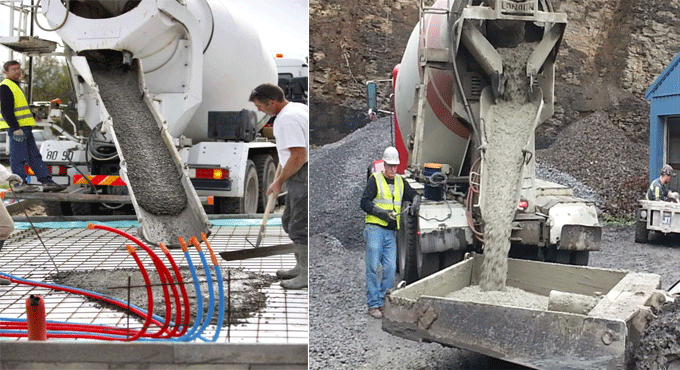
The ready mix concrete is better as compared to the ordinary concrete mix since it needs less labour, time, efforts and cost. It facilitates to retain homogeneous quality during the work and provides the high speed of concrete construction.

With ready mix concrete, various types of issues like inferior workability, segregation, and bleeding, inappropriate water cement ratio, insufficient mixing time can be easily resolved in the construction site.

Prior to order ready mix concrete, the following points should be taken into consideration :-

01. Grade of Concrete or Mix Design

• Types of work where the concrete will be poured i.e. foundation slab, floor slab, pavements, etc.
• Grade of concrete necessary on site, i.e. M15, M20, M25, M30, etc.
• Slump of concrete both at the batching plant and at the job site.
• The quantity of concrete in cubic meter or cubic yard.
• Address or place of concrete pouring.
• Time of requirement of ready mix concrete on site.
• Time of interval among the two consecutive deliveries of RMC (in the case of higher quantity i.e. exceeding 6 cubic meter).


02. Fly Ash should not be used extra: It is essential to get the proper ratio of fly ash in the concrete. Some RMC producer includes extreme amount of fly ash in concrete which aren’t suggested also by the standards.

Generally, the fly ash is added in concrete at levels which vary from 15% to 25% by mass of the cementitious material component. Plant owner accomplishes this so that the cost is decreased and the profit is raised. So, the purchase should be careful for buying RMC at lower rates, and not get deceived with this lower rates.

It is also essential to get the source of every concrete ingredients (cement, aggregates, admixture, and water), the ratio and quantity of the concrete material per cubic meter, and the types of admixtures applied in RMC. So, prior to give order for ready mix concrete, obtain the above information. i.e. details of mix design from dealer.

03. Source of materials: The RMC dealers buy various concrete materials from diverse sources. The quality of materials may not be always good. So, all the sources should be assessed carefully. If their sources are recognized in the local market for the quality, then the ready-mix dealer can be selected, who will purchase the concrete materials from those renowned sources.

04. Time for Transportation: According to IS 4926:2003, it is recommended to pour the ready mix concrete within 2 hours from the time of loading at the central batching plant. However, a higher period is allowed if retarding admixture is utilized. But, determine the type of retarder used and all steps are followed as suggested by retarding manufacture.

05. Application of Admixture: Sometimes the extra dose of admixture is included at the project site to retrieve the workability of concrete. Some admixtures have chlorides, and if so, it is required to get the amount of chloride content in percentage of the total mass of admixture. If the amount of chloride is increased in ready mix concrete, it will lead to corrosion of the reinforcement steel and the service life of the house or building will be significantly affected. Hence, such admixtures should not be used.

06. Test of Concrete: It is indicated in standards that the ready mix concrete dealers should arrange test facilities at its premises to conduct routine tests, i.e. concrete slump test, concrete cube testing, etc. So, it is possible to double check the workability and strength of ordered concrete.

The workability of concrete can also be verified with slump test on site. Slump of concrete is primarily based on the condition of placement and the requirement of degree of workability. According to IS 456:2000, low reinforced sections like slabs, beams, walls, columns, etc. are casted with the slump of 25 to 75 mm. Heavily reinforced sections like slabs, beams, walls, columns, etc. are casted with the slump of 50 to 100 mm. From slip form work or pumped concrete, the appropriate slump of concrete is 75 to 100mm.

07. Information about Delivery Ticket of Ready Mix Concrete

The information given below, should be providedd in the ready mix concrete delivery ticket for each batch:

• Name and number of the ready-mixed concrete plant.
• Date and serial number of the ticket
• Truck Number
• Name of the purchaser and location of the site
• Grade of concrete
• Mix design details
• Type and size of concrete ingredients and their weight in table format.
• The quantity of concrete in the cubic meter
• Time of loading
• Slump results at the batching plant
• Signature of the concrete plant operator


The information given below, is required to be filled on ready mix concrete ticket on site.

• Time of arrival on site
• The time when discharge was completed
• Any water/admixture added on site
• Location of pouring of concrete
• Slump test result at the site
• Signature of RMC receiver


Some vital points to be remembered before purchasing ready mix concrete

Read more

~~~~~~~~~~~~~~~~~~~~~~~~
Published By
Rajib Dey
www.constructioncost.co
~~~~~~~~~~~~~~~~~~~~~~~~