adsense analytic

Showing posts with label Brick Work. Show all posts

Saturday, November 17, 2018

Get some easy to follow tips for executing brick masonry from Floor to roof

Brick masonry work is one of the most vital part of building construction. In this informative construction article, you will learn how to accomplish the complete brick masonry work from Earth beam to roof.
The following four major steps are involved in brick masonry work :-
1. up to basement
2. up to sill level
3. up to lintel level
4. up to roof level.
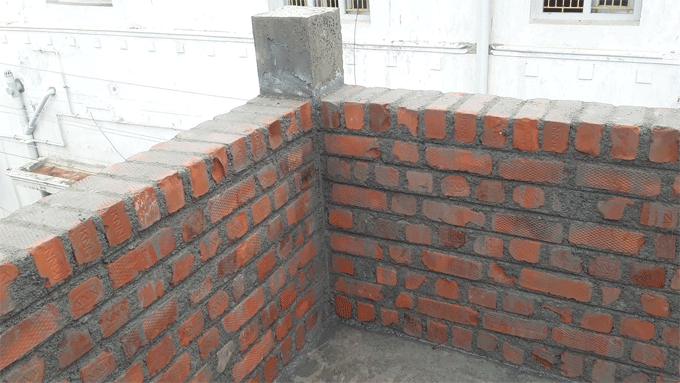
Brick masonry up to Basement:
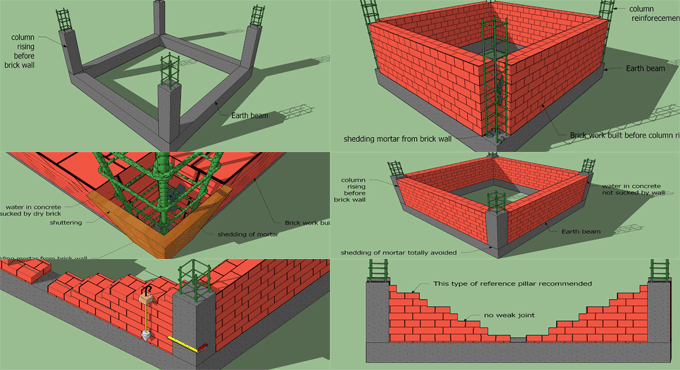
Prior to erect brick masonry, the most crucial task is to finish all adjoining column up to basement.
It is recommended to execute the column rising work prior to brick masonry otherwise the following problems may occur :-
While erecting brick wall, shedding of mortar should be provided in to the column bottom to make it rigid and not smoothly detachable.
In next day, as soon as the shuttering work is completed, some saw dust from different shuttering materials like plywood, timber also shedding in to the column bottom. They can’t be detached easily after shuttering.
When the column concrete is arranged after the completion of the brick masonry, the water in the concrete is absorbed with dry brick wall and a dry concrete is placed there devoid of adequate water cement ratio and it leads to a weak structure.
Therefore, the exact method is to initially execute the column work and after that accomplish the brick wall.
Initially, cleanse the entire earth beam with water and ready surface. Employ semi solid cement slurry on it. Spatter the brick with water. Chip the column sides by chisel and make the column surface rough so that a perfect binding is formed with brick joint.
Initially, erect the brick masonry as a reference pillar similar to a benchmark in all corners by applying the plump, set square and verify each opposite brick wall corner with level for each 3 courses. Alter the thickness of the mortar to retain the proper level. Abide by the remaining unless it attains the basement.
There will be 2 options just like above. Any one method can be applied at corners and in cross wall extension.
In the 1st method, there should be no weak straight joints. Mortar can be easily provided.
In the 2nd method, there should be weak straight joint. Mortar can't be easily provided for progressing further.
Once the corner reference wall is finished, each course can be formed one by one by attaching a strong thread among the two benchmark and thus the whole basement will be finished easily.
To get more detail information, go through the following link youtoobuild.blogspot.com

Get some easy to follow tips for executing brick masonry from Floor to roof
~~~~~~~~~~~~~~~~~~~~~~~~
Published By
Rajib Dey
www.constructioncost.co
~~~~~~~~~~~~~~~~~~~~~~~~

Thursday, November 15, 2018

Some useful guidelines for constructing parapet wall

Parapet wall stands for a protection wall that can resist the collapsing from terrace to ground. Different types of parapet walls are found which range from brick wall masonry parapet wall, wooden handrail, iron grill etc.

Size of parapet wall:

1. Thickness of parapet wall should be minimum 9''. (full brick parapet wall)
2. Half brick parapet wall is not recommended for use.
3. Height of the parapet should be minimum 3'0''.


Once the centering and shuttering from roof slab bottom is detached, some deflection may happen at mid span of roof slab (positive bending moment). Similar thing will happen at support like negative bending moment.

With a view to prevent negative bending moment at support, huge amount of loads are required as downwards. In case of constructing the parapet wall as half brick wall, the roof can’t be prevented from uplifting. If the parapet wall is constructed as minimum 9'' thickness and minimum 3'0'' height, the roof slab can be prevented from uplifting. Therefore, different types of cracks at bottom of ceiling will be captured. To get rid of uplifting of roof, the centering & shuttering should be eliminated once the entire full brick parapet wall is constructed.

If the first floor is extended in future, the existing parapet wall should not be dismantled in case the wall is constructed as 9'' thick.

Assume, the parapet wall is constructed as half brick wall, now it is required to demolish the current parapet wall up to roof and make it as 9'', therefore, extra money will be incurred up to sill level of first floor.

While erecting half brick parapet wall, brick pillars should be arranged at regular interval ( 5 to 6 feet). Inner surface of parapet wall does not include flat surface since lots of offset will be created. Therefore, some problems will arise in waterline and sanitary plumping works.

Water from pump and discharge from water tank will be influenced with various offset produced with half brick parapet wall.

No tie exists for half brick parapet wall. As a result, wind pressure may provide some effects. Sliding of parapet wall may also happen.

If the column height is terminated for the height of the parapet wall (3 feet), it is required to dismantle for overlapping in future first floor construction. Adjacent Brick parapet wall will also be affected. If the height of parapet wall remains 3 feet, the column height should be increased for extra height for future overlapping. Then the column and parapet wall will be protected from over damaged.

Conclusion:
It is recommended to construct full brick parapet wall for minimum height of 3 feet devoid of half brick parapet wall.
There should be some provision for column for future overlapping.


Some useful guidelines for constructing parapet wall

Read more
~~~~~~~~~~~~~~~~~~~~~~~~
Published By
Rajib Dey
www.constructioncost.co
~~~~~~~~~~~~~~~~~~~~~~~~

Wednesday, September 26, 2018

Some useful guidelines to substitute the spalling bricks

Freezing and thawing water in brick leads to flaking and spalling and due to these the bricks are damaged severely.

In this construction article, you will get some useful tips for recognizing spalling on bricks. Besides, you will learn how to take proper measures so that the water can’t enter into the brick walls. Otherwise, it will be necessary to substitute the damaged bricks.

How to substitute the damaged bricks

The brick retaining wall under a wood fence may be broken down. The flaking surface is a good instance of “spalling,” a type of failure resulting from moisture and the freeze/thaw cycle. Water from rainfall, melting snow or even wet soil soak the brick to some extent, and freeze inside the brick while the temperature is decreased.

The small development of freezing water will rupture the brick. If freezing and thawing occur in continuous basis, the fractures are expanded unless the brick is perfectly decomposed.

To get rid of these issues, bricks utilized on the outside should normally become tougher and solid (less moisture absorption). A softer brick in the wall that is mixed in the load may collapse. If massive failure occurs, there is serious water intrusion issue.

The outside walls should be detailed cautiously to discharge water, specifically when they’re inherent section of a retaining wall. There should be a coping or cap on the wall to discharge the rain water.

It comprises of metal flashing, concrete or special bricks which are angled to keep water far from the top of the wall. The cap exists there for one time, but it may be eliminated or tired. Besides, the wood fence over perhaps catches and directs even more water down onto the wall.

While going to reconstruct your brick wall, ensure it’s designed to reduce water penetration. Aside from a cap on the top, it should contain good draining fill (gravel) along the backside and weep holes along the bottom to lessen water pressure when the soil gets soaked.

Damp-proofing the backside of the wall will also facilitate the water to be discharged properly. There should be good drainage system around the base to resist penetration of water from below.

Necessary Tools for this Spalling Project

Given below, the detail lists of tools :-

Circular saw, Cold chisel, Dust mask, Extension cord, Hammer, Hearing protection, Level, Safety glasses, Sledgehammer, Spade, Tape measure, Trowel, Utility knife, Wheelbarrow.

A masonry blade is also necessary to cut the brick with circular saw.

Essential Materials for this Spalling Project

Brick, Drain tile, Gravel, Landscape fabric, Mortar.

Some useful guidelines to substitute the spalling bricks

~~~~~~~~~~~~~~~~~~~~~~~~
Published By
Rajib Dey
www.constructioncost.co
~~~~~~~~~~~~~~~~~~~~~~~~

Friday, December 1, 2017

How to calculate mason, labor for brick masonry construction with help of thumb rule

In this construction video tutorial, you will learn how to compute the mason as well as labor toward a 1st class brick masonry construction with the help of thumb rule.

A thumb rule refers to a principle having extensive application that is not projected to be exactly perfect or authentic for each situation. This method can be easily applied for making approx calculation or recollecting some value, or for making some determination.


It should be noted that the quantity of required labor will be gradually increased from ground floor to first floor to second floor etc.
Thumb rule is a constant value that is taken from the earlier construction work i.e. how much volume is covered by the labors employed in earlier projects. All the volumes are summed up to find out the average volume.
In ground floor, first floor and second floor, the volume of total area is taken as 150 m3
Ground floor :-
Mason = Volume x thumb rule (for mason) = 150 x 0.71 = 107 numbers
Now, suppose the charge for one mason = 1100 rupees
So, the cost for mason will be 107 x 1100 = 117, 700 rupees
Labor = 150 x 1.18 (thumb rule for labor) = 177 numbers
Suppose, one labor charge 800 rupees
Therefore, cost of labor = 177 x 800 = 141,600 rupees
Similar process should be followed for 1st floor and 2nd floor. Here, the value of thumb rule will be increased as the steps are increase.
To learn the calculation for 1st and 2nd floor, watch the following construction video tutorial.

How to calculate mason, labor for brick masonry construction with help of thumb rule

Read more

~~~~~~~~~~~~~~~~~~~~~~~~~
Published By
Rajib Dey
www.constructioncost.co
~~~~~~~~~~~~~~~~~~~~~~~~~


Tuesday, June 27, 2017

Learn to compute cement quota, brickwork volume & no. of fixes for a brick wall

This construction video tutorial will show the details of cement quota, brick work volume, number of fixes for a brick wall construction.
To calculate the brickwork volume, just apply the following formula :-
Total brickwork area x wall thickness
= 31.98 x 0.2 = 6.38 m3

The ratio of cement & mortar needed in brickwork is 1:3 (it can also be taken as 1:5 and 1:6).
Volume of brickwork = 6.38 m3
For 1 cubic meter of cement mortar, the volume of sand will be 0.2m3
For 6.38 cubic meter, the volume of sand will be 6.38 x 0.2 = 1.276 m3
For 1m3 cement mortar, the volume of cement will be = (0.2x1440)/3 (3 denotes last digit of ratio)
= (0.2 x 1440)/3 = 96 KGS
For 6.38 cubic meter, the volume of cement will be 6.38 x 96 = 612.48 KGS
To work out the number of cement bags, just divide it by 50 (as weight of 1 cement bag is similar to 50 Kg)
Therefore, 612.48/50 = 12.24 bags = 13 bags (approx.)


Read more

~~~~~~~~~~~~~~~~~~~~~~~~
Published By
Rajib Dey
www.constructioncost.co

~~~~~~~~~~~~~~~~~~~~~~~~