adsense analytic

Showing posts with label Laboratory Testing. Show all posts

Thursday, January 31, 2019

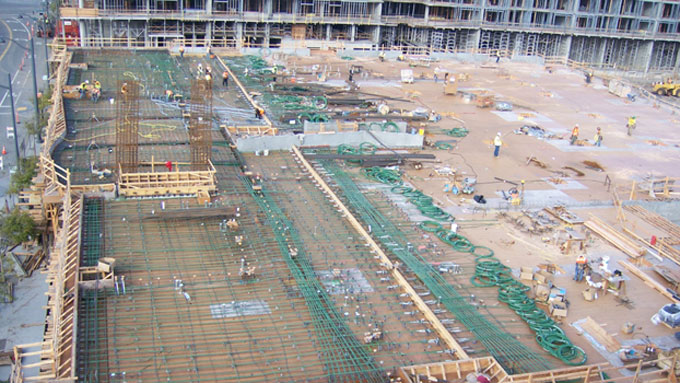
Some vital steps for concrete post-pour inspection

This civil engineering article sheds light on the required steps for post-concrete inspection as soon as decluttering of any concrete structure is completed.

The activities prior to arrange concrete comprise of utilization and maintenance of curing compound or other techniques of curing, form removal, concrete repair and preservation of concrete cubes. The subcontractor will inform QA/QC that curing is retained by the submittal of curing records.

Some vital Inspection points:

Given below, the details about major key inspection items to be examined and/or checked in the context of concrete post placement activities:

• Ensure that the necessary method of curing is prepared.
• Ensure that the placement is examined constantly to assure uninterrupted curing (watch for dry spots).

• Ensure that curing is retained for a prolonged time if necessary.
• Ensure that proper protection against bad weather is taken when necessary (hot or cold weather) as indicated in specifications.
• Ensure that concrete forms are departed in exact position for prolonged time to assure that form removal will keep concrete undamaged or workers (take precautions concerning the forms supporting the weight of the concrete to make sure the concrete has attained adequate strength to sustain its own weight)

• When repair of concrete is essential, check that it is repaired compliant with specifications (on the basis of the intensity of the repair, verify if a nonconformance report is necessary)
• Ensure that concrete cylinders are preserved on site in conformity with BS codes and job site requirements
• Ensure that concrete cylinders are transported to the testing laboratory and consequently tested compliant with BS and job site requirements Documentation


The Concrete Pour Card (Attached at the end) and Concrete Test Report as well as all supporting documents associated with the concrete pour should be arranged in the master file for the specific concrete pour. These files should be retained during the construction process and prepared in compliance with the methods of Control of Quality Records. There should be a proper labeling system for the project that sustains traceability among the concrete test report and the Concrete Pour Card.
Some vital steps for concrete post-pour inspection

Read more
~~~~~~~~~~~~~~~~~~~~~~~~~
Published By
Rajib Dey
www.constructioncost.co
~~~~~~~~~~~~~~~~~~~~~~~~~
Friday, January 4, 2019

Some vital tests for checking compressive strength of cement

If water is included in the cement, the compressive strength of the hardened cement is considered as the vital factor. Cement hydrates and exposes cohesion and consistency. It joins all the components like cement, sand, aggregate etc. collectively. The hardiness of cement-based compound like mortar/concrete is based on the type and nature of cement.

Owing to strength, nature of cement, both mortar and concrete contain high strength against compression and less strength against tension. Therefore, testing of cement for compressive strength is very crucial. Cement is examined for compressive strength so that the strength and stability of the structure is retained.

Initial strength gain is affected by high lime or high alumina content. The firmness of cement is also impacted with the degree of burning, the fineness of grinding, and the aeration it obtains once the final grinding is completed.

Under the strength test, cement mortar is applied since neat cement produces shrinkage and cracking and it becomes complicated for testing.

Primarily, cement is recognized with its compressive strength. Cement is designated with its grade like 53 grade, 43 grade, 33 grade of cement. This grade signifies the compressive strength of cement, i.e. 53 grade of cement species that compressive strength of cement cube after 28 days of curing should be 53 N/mm2 (MPa) or 530 kg/cm2.

Compressive Strength Test of Cement according to IS 4031 (Part 6) 1988.

The following equipments are required for conducting the test :

• Compression Testing Machine or Universal Testing Machine.
• Cube Mould: 70.6 mm*70.6 mm*70.6 mm size
• Vibrating Machine
• Weighing Machine
• Gauging Trowel
• Measuring Cylinder
• Tray


Method: Arrangement Of Test Samples

• Testing material is cement, sand and water.
• The necessary material for each cube is as follows:


1. Cement – 200gm,
2. Sand – 600gm,
3. Water quantity (P/4 + 3) % of the total mass of cement and sand. Where P denotes the standard consistency of cement.
• Initially, blend cement and sand in dry condition with a trowel for one minute and then include water and blend unless homogeneous colour is produced.
• The time of mixing should not be under 3 minutes and not in excess of 5 minutes.


Moulding Samples
• Once the blending is completed, mortar is provided in the cube mould. Prior to arrange the mortar, use oil on the inside surface of cube mould.
• To discharge the entrained air and get rid of honeycombing, the mortar should be stimulated 20 times in about 8 s and then consolidated with vibration.
• The vibration period should be 2 minutes at the certain speed of 12 000 ± 400 vibrations per minute.
• Then, the top surface of the cube in the mould should be completed by leveling the surface with the blade of a trowel.


Curing Samples
• Once the vibration is finished, retain the filled moulds in a moist closet or moist room for 24 hours.
• As soon as that period is ended, detach mortar cube from the moulds and instantly immerse in clean, fresh water and put there unless it is removed before testing.
• The cubes should not get dried once they are removed and unless they are tested.


Testing
• The testing is done with compression testing machine or universal testing machine.
• Test 3 cubes for compressive strength for every time period according to detailed specifications. As for instance 3 cubes for 3 days test, 3 cubes for 7 days test and 3 cubes for 28 days test.
• The cubes testing should be performed on their sides. No packing among the cube is allowed and the steel plates of the compression testing machine while testing is going on.
• The load shall be gradually and consistently employed and the rate of loading should remain 35 N/mm2/min.


Points to be considered
• Clean appliances should be applied for the tests.
• Test for temperature and humidity should be carried out at 27 ± 2°C temperature and 65 ± 5 percent of the relative humidity of the laboratory.
• The water in which the cubes are immersed should be changed every 7 days and retained at a temperature of 27 ± 2°C
• While determining the compressive strength, the faulty samples should not be utilized.
• The samples which produce strength differing by above 10 % from the average value of all the test samples.


Some vital tests for checking compressive strength of cement

Read more
~~~~~~~~~~~~~~~~~~~~~~~~~
Published By
Rajib Dey
www.constructioncost.co
~~~~~~~~~~~~~~~~~~~~~~~~~
Wednesday, December 26, 2018

How impact value of coarse aggregate is determined

Impact value of coarse aggregate plays an important role to find out the moisture content of coarse aggregate.

For this purpose, the following equipments are required :-

1) Impact testing machine (metal base)
2) A cylindrical steel cup of internal dimension: 102mm & depth 50mm.
3) IS sieves of sizes 12.5, 10 & 2.36mm.
4) A straight metal tamping rod having circular cross section 16mm in dia. And 600mm long rounded at one end.
5) Weight balance of 01 gm.
6) A relevant oven thermostatically controlled to retain a temperature of 100°C to 110°C Samples:

1. i) Coarse Aggregate

The following methods should be applied :-

1. The impact machine stands devoid of wedging or packing upon the level plate. 
2. The cup should be attached rigidly in exact location on the base of the machine and entire test sample should arranged in it depending on fifteen blows of the metal hammer of weight 14 kg downfallen from a height of 38 cm.
3. The quantity of fine material that goes through 2.36mm resultantly from pounding will point out the strength of the sample of aggregate. The proportion of the weight of the fines (finer than 2.36mm size) developed to be taken as weight of the total sample selected is stated as a percentage. It is called as aggregate impact value as per IS 283-1970

Result:

Aggregate impact value does not surpass 45 percent by weight for aggregate utilized for concrete apart from wearing surface and 30 percent by weight for concrete for wearing surface like run way, roads and pavements.

To get more detail, go through the following link wrengineers.in

How impact value of coarse aggregate is determined

~~~~~~~~~~~~~~~~~~~~~~~~
Published By
Rajib Dey
www.constructioncost.co
~~~~~~~~~~~~~~~~~~~~~~~~

Saturday, December 15, 2018

Details of Sieve Analysis Method

Sieve analysis is conducted to establish the particle size distribution of the coarse and fine aggregates. This is performed with sieving the aggregates according to IS: 2386 (Part I) – 1963. Here, various types of sieves are applied as recommended by the IS code and then the aggregates are passed through them and thus the particles with different sizes are obtained which are abandoned on various sieves.

The following equipments are utilized for sieve analysis.

i) A set of IS Sieves of sizes – 80mm, 63mm, 50mm, 40mm,31.5mm, 25mm, 20mm, 16mm, 12.5mm, 10mm, 6.3mm,4.75mm, 3.35mm, 2.36mm, 1.18mm, 600µm, 300µm, 150µm and 75µm.

ii) Balance or scale with a precision to calculate 0.1 percent of the weight of the test sample. The sample for sieving is created from the bigger sample either by quartering or with the help of a sample divider.

Sieving Test Method as per British standard

Materials Required
Specimen, sieve shaker, BS410 Standard sieves, 0.1g accuracy balance, oven, porcelain dish and spatula, receiving pan, cleaning brush and clock.


Method:
Cleanse the sieves of sieve shaker with cleaning brush to check whether any particles are blocked in the openings.


Note down the weight of each sieve and receiving pan.
Dry the specimen in oven for 3-4 minutes to obtain the dried specimen (overlook, if the specimen is already dried).
Weigh the specimen and note down its weight.


Place the sieves in such a manner that the smaller openings sieve remains to the last and larger openings sieve remains to the top. (Just, organize them to the ascending order of sieve numbers – No.4 sieve on top and no.200 sieve at bottom).

Retain the weight recorded specimen on the top sieve and then provide the complete sieve stack on the sieve shaker along with the lid and receiving pan.
Let the shaker to function 10-5 minutes – Utilize the clock here.
Detach the sieve stack from the shaker and note down the weight of each sieve and receiving pan individually.


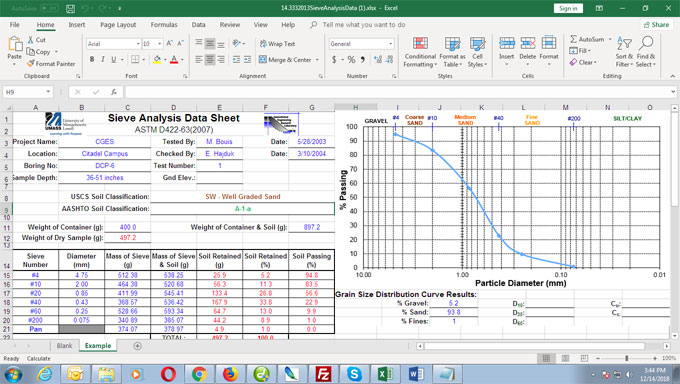
Download the following sample sheet for sieve analysis.

Details of Sieve Analysis Method

~~~~~~~~~~~~~~~~~~~~~~~~
Published By
Rajib Dey
www.constructioncost.co
~~~~~~~~~~~~~~~~~~~~~~~~